


学习最快的方法就是看官方文档,看官方例子。
我们先来看看官方例子
首先看一张图,这个图很重要。
Spring Batch 的组成:
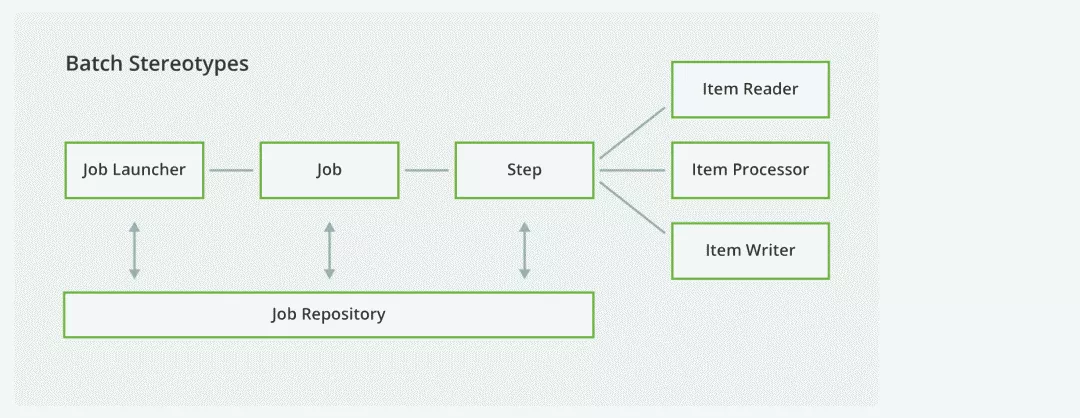
- Spring Batch 里最基本的单元就是任务 Job,一个 Job 由若干个步骤 Step 组成。
- 任务启动器 Job Launcher 负责运行 Job。
- 任务存储仓库 Job Repository 存储着 Job 的执行状态,参数和日志等信息。Job 处理任务又可以分为三大类:
- 数据读取 Item Reader
- 数据中间处理 Item Processor
- 数据输出 Item Writer
先来说下官方例子的主要做的功能
就是读取sample-data.csv里的数据存到数据库。我们以后可以参考直接那他的例子用(批量插入数据)。
sample-data.csv
Jill,Doe
Joe,Doe
Justin,Doe
Jane,Doe
John,Doe
schema-all.sql
DROP TABLE people IF EXISTS;

CREATE TABLE people  (
    person_id BIGINT IDENTITY NOT NULL PRIMARY KEY,
    first_name VARCHAR(20),
    last_name VARCHAR(20)
);
pom.xml
<?xml version="1.0" encoding="UTF-8"?>
<project xmlns="http://maven.apache.org/POM/4.0.0" xmlns:xsi="http://www.w3.org/2001/XMLSchema-instance"
	xsi:schemaLocation="http://maven.apache.org/POM/4.0.0 https://maven.apache.org/xsd/maven-4.0.0.xsd">
	<modelVersion>4.0.0</modelVersion>
	<parent>
		<groupId>org.springframework.boot</groupId>
		<artifactId>spring-boot-starter-parent</artifactId>
		<version>2.5.2</version>
		<relativePath/> <!-- lookup parent from repository -->
	</parent>
	<groupId>com.example</groupId>
	<artifactId>batch-processing-complete</artifactId>
	<version>0.0.1-SNAPSHOT</version>
	<name>batch-processing-complete</name>
	<description>Demo project for Spring Boot</description>
	<properties>
		<java.version>1.8</java.version>
	</properties>
	<dependencies>
		<dependency>
			<groupId>org.springframework.boot</groupId>
			<artifactId>spring-boot-starter-batch</artifactId>
		</dependency>

		<dependency>
			<groupId>org.hsqldb</groupId>
			<artifactId>hsqldb</artifactId>
			<scope>runtime</scope>
		</dependency>
		<dependency>
			<groupId>org.springframework.boot</groupId>
			<artifactId>spring-boot-starter-test</artifactId>
			<scope>test</scope>
		</dependency>
		<dependency>
			<groupId>org.springframework.batch</groupId>
			<artifactId>spring-batch-test</artifactId>
			<scope>test</scope>
		</dependency>
	</dependencies>

	<build>
		<plugins>
			<plugin>
				<groupId>org.springframework.boot</groupId>
				<artifactId>spring-boot-maven-plugin</artifactId>
			</plugin>
		</plugins>
	</build>

</project>
开始看代码
Person.java 数据实体类没啥说的
public class Person {

	private String lastName;
	private String firstName;

	public Person() {
	}

	public Person(String firstName, String lastName) {
		this.firstName = firstName;
		this.lastName = lastName;
	}

	public void setFirstName(String firstName) {
		this.firstName = firstName;
	}

	public String getFirstName() {
		return firstName;
	}

	public String getLastName() {
		return lastName;
	}

	public void setLastName(String lastName) {
		this.lastName = lastName;
	}

	@Override
	public String toString() {
		return "firstName: " + firstName + ", lastName: " + lastName;
	}

}
BatchConfiguration.java 重点来了
import javax.sql.DataSource;

import org.springframework.batch.core.Job;
import org.springframework.batch.core.JobExecutionListener;
import org.springframework.batch.core.Step;
import org.springframework.batch.core.configuration.annotation.EnableBatchProcessing;
import org.springframework.batch.core.configuration.annotation.JobBuilderFactory;
import org.springframework.batch.core.configuration.annotation.StepBuilderFactory;
import org.springframework.batch.core.launch.support.RunIdIncrementer;
import org.springframework.batch.item.database.BeanPropertyItemSqlParameterSourceProvider;
import org.springframework.batch.item.database.JdbcBatchItemWriter;
import org.springframework.batch.item.database.builder.JdbcBatchItemWriterBuilder;
import org.springframework.batch.item.file.FlatFileItemReader;
import org.springframework.batch.item.file.builder.FlatFileItemReaderBuilder;
import org.springframework.batch.item.file.mapping.BeanWrapperFieldSetMapper;
import org.springframework.batch.item.file.mapping.DefaultLineMapper;
import org.springframework.batch.item.file.transform.DelimitedLineTokenizer;
import org.springframework.beans.factory.annotation.Autowired;
import org.springframework.context.annotation.Bean;
import org.springframework.context.annotation.Configuration;
import org.springframework.core.io.ClassPathResource;
import org.springframework.jdbc.core.JdbcTemplate;

// tag::setup[]
@Configuration
@EnableBatchProcessing
public class BatchConfiguration {

	@Autowired
	public JobBuilderFactory jobBuilderFactory;

	@Autowired
	public StepBuilderFactory stepBuilderFactory;
	// end::setup[]

	// tag::readerwriterprocessor[]
	@Bean
	public FlatFileItemReader<Person> reader() {
		return new FlatFileItemReaderBuilder<Person>()
			.name("personItemReader")
			.resource(new ClassPathResource("sample-data.csv"))
			.delimited()
			.names(new String[]{"firstName", "lastName"})
			.fieldSetMapper(new BeanWrapperFieldSetMapper<Person>() {{
				setTargetType(Person.class);
			}})
			.build();
	}

	@Bean
	public PersonItemProcessor processor() {
		return new PersonItemProcessor();
	}

	@Bean
	public JdbcBatchItemWriter<Person> writer(DataSource dataSource) {
		return new JdbcBatchItemWriterBuilder<Person>()
			.itemSqlParameterSourceProvider(new BeanPropertyItemSqlParameterSourceProvider<>())
			.sql("INSERT INTO people (first_name, last_name) VALUES (:firstName, :lastName)")
			.dataSource(dataSource)
			.build();
	}
	// end::readerwriterprocessor[]

	// tag::jobstep[]
	@Bean
	public Job importUserJob(JobCompletionNotificationListener listener, Step step1) {
		return jobBuilderFactory.get("importUserJob")
			.incrementer(new RunIdIncrementer())
			.listener(listener)
			.flow(step1)
			.end()
			.build();
	}

	@Bean
	public Step step1(JdbcBatchItemWriter<Person> writer) {
		return stepBuilderFactory.get("step1")
			.<Person, Person> chunk(10)
			.reader(reader())
			.processor(processor())
			.writer(writer)
			.build();
	}
	// end::jobstep[]
}
- 步骤的数据读取 Item Reader
@Bean
	public FlatFileItemReader<Person> reader() {
		return new FlatFileItemReaderBuilder<Person>()
			.name("personItemReader")
			.resource(new ClassPathResource("sample-data.csv"))
			.delimited()
			.names(new String[]{"firstName", "lastName"})
			.fieldSetMapper(new BeanWrapperFieldSetMapper<Person>() {{
				setTargetType(Person.class);
			}})
			.build();
	}
这个就是步骤的读取,看那个泛型就读取出来的数据类型(后面Item Processor的入参),官方的这个就是读取sample-data.csv数据转转换成Person实体类。这个的返回值很重要(因为关系我们自己的实现),根据step需要的参数反推出,只要是返回ItemReader,就可以,这是个函数式接口。我们非常方便使用Lambda表达式实现赞。T就是后面Processor的入参
public interface ItemReader<T> {
    @Nullable
    T read() throws Exception, UnexpectedInputException, ParseException, NonTransientResourceException;
}
- 数据中间处理 Item Processor
	@Bean
	public PersonItemProcessor processor() {
		return new PersonItemProcessor();
	}
PersonItemProcessor.java 以后的复杂处理全在这里做
public class PersonItemProcessor implements ItemProcessor<Person, Person> {

	private static final Logger log = LoggerFactory.getLogger(PersonItemProcessor.class);

	@Override
	public Person process(final Person person) throws Exception {
		final String firstName = person.getFirstName().toUpperCase();
		final String lastName = person.getLastName().toUpperCase();

		final Person transformedPerson = new Person(firstName, lastName);

		log.info("Converting (" + person + ") into (" + transformedPerson + ")");

		return transformedPerson;
	}

}
官方的这个例子Processor就是把Item Reader读取的Person属性转化为大写Person返回去,我们自己的Processor要实现ItemProcessor接口,接口的两个泛型第一是Reader传过来的泛型,第二是Processor返回的泛型。ItemProcessor也是函数式接口,泛型 YYDS。
- 数据输出 Item Writer 和Reader差不多,Reader是入,Writer是出 主要就是取到Processor处理的数据插入数据库
@Bean
	public JdbcBatchItemWriter<Person> writer(DataSource dataSource) {
		return new JdbcBatchItemWriterBuilder<Person>()
			.itemSqlParameterSourceProvider(new BeanPropertyItemSqlParameterSourceProvider<>())
			.sql("INSERT INTO people (first_name, last_name) VALUES (:firstName, :lastName)")
			.dataSource(dataSource)
			.build();
	}
- Step 步骤(是batch的组件)
	@Bean
	public Step step1(JdbcBatchItemWriter<Person> writer) {
		return stepBuilderFactory.get("step1")
			.<Person, Person> chunk(10)//每次处理10条,泛型是reader,writer需要的参数
			.reader(reader())
			.processor(processor())
			.writer(writer)
			.build();
	}
我们看到一个step是由reader,processor,writer组成,这个顺序就是step执行的顺序。
JobCompletionNotificationListener.java
@Component
public class JobCompletionNotificationListener extends JobExecutionListenerSupport {

	private static final Logger log = LoggerFactory.getLogger(JobCompletionNotificationListener.class);

	private final JdbcTemplate jdbcTemplate;

	@Autowired
	public JobCompletionNotificationListener(JdbcTemplate jdbcTemplate) {
		this.jdbcTemplate = jdbcTemplate;
	}

	@Override
	public void afterJob(JobExecution jobExecution) {
		if(jobExecution.getStatus() == BatchStatus.COMPLETED) {
			log.info("!!! JOB FINISHED! Time to verify the results");

			jdbcTemplate.query("SELECT first_name, last_name FROM people",
				(rs, row) -> new Person(
					rs.getString(1),
					rs.getString(2))
			).forEach(person -> log.info("Found <" + person + "> in the database."));
		}
	}
}
-
Listener监听,afterJob这个是job执行完,JobExecutionListenerSupport ,还有个beforeJob这个是job执行前。JobExecution 是Job执行的一些参数。官方的例子是job执行完毕,job执行结果为成功,则调jdbc查询数据库打印日志。
-
Job
	@Bean
	public Job importUserJob(JobCompletionNotificationListener listener, Step step1) {
		return jobBuilderFactory.get("importUserJob")
			.incrementer(new RunIdIncrementer())//递增项,需要数据库维护执行顺序
			.listener(listener)//监听
			.flow(step1)//多step组成flow
			.end()
			.build();
	}
这就是构建一个job所需要的参数。job有多种类型SimpleJob,JsrFlowJob。
实践
-
新建一个名称为 springbatch 的 MySQL 数据库,然后导入 org.springframework.batch.core 目录下的 schema-mysql.sql 文件:
-
然后在项目的配置文件 application.yml 里添加 MySQL 相关配置:
spring:
  datasource:
    driver-class-name: com.mysql.cj.jdbc.Driver
    url: jdbc:mysql://127.0.0.1:3306/springbatch
    username: root
    password:
pom.xml
<?xml version="1.0" encoding="UTF-8"?>
<project xmlns="http://maven.apache.org/POM/4.0.0" xmlns:xsi="http://www.w3.org/2001/XMLSchema-instance"
         xsi:schemaLocation="http://maven.apache.org/POM/4.0.0 https://maven.apache.org/xsd/maven-4.0.0.xsd">
    <modelVersion>4.0.0</modelVersion>
    <parent>
        <groupId>org.springframework.boot</groupId>
        <artifactId>spring-boot-starter-parent</artifactId>
        <version>2.5.2</version>
        <relativePath/> <!-- lookup parent from repository -->
    </parent>
    <groupId>com.jinlong</groupId>
    <artifactId>batch</artifactId>
    <version>0.0.1-SNAPSHOT</version>
    <name>batch</name>
    <description>batch project for Spring Boot</description>
    <properties>
        <java.version>1.8</java.version>
    </properties>
    <dependencies>
        <dependency>
            <groupId>org.springframework.boot</groupId>
            <artifactId>spring-boot-starter-batch</artifactId>
        </dependency>
        <dependency>
            <groupId>mysql</groupId>
            <artifactId>mysql-connector-java</artifactId>
        </dependency>
        <dependency>
            <groupId>org.springframework.boot</groupId>
            <artifactId>spring-boot-starter-jdbc</artifactId>
        </dependency>
    </dependencies>

    <build>
        <plugins>
            <plugin>
                <groupId>org.springframework.boot</groupId>
                <artifactId>spring-boot-maven-plugin</artifactId>
            </plugin>
        </plugins>
    </build>

</project>
- 接着在 创建config文件BatchConfigurationjava 的类上添加 @EnableBatchProcessing,@Configuration 注解,表示开启 Spring Batch 批处理功能:
@Configuration
@EnableBatchProcessing
public class BatchConfiguration {
}
至此,基本框架搭建好了,下面开始配置一个简单的任务。
编写第一个任务
在 com.jinlong.batch 目录下新建 job 包,然后在该包下新建一个 FirstJobDemo 类,代码如下所示
@Component
public class FirstJobDemo {

    @Autowired
    private JobBuilderFactory jobBuilderFactory;
    @Autowired
    private StepBuilderFactory stepBuilderFactory;

    @Bean
    public Job firstJob() {
        return jobBuilderFactory.get("firstJob")
                .start(step())
                .build();
    }

    private Step step() {
        return stepBuilderFactory.get("step")
                .tasklet((contribution, chunkContext) -> {
                    System.out.println("执行步骤....");
                    return RepeatStatus.FINISHED;
                }).build();
    }
}
上面代码中,我们注入了JobBuilderFactory任务创建工厂和StepBuilderFactory步骤创建工厂,分别用于创建任务 Job 和步骤 Step。JobBuilderFactory的get方法用于创建一个指定名称的任务,start方法指定任务的开始步骤,步骤通过StepBuilderFactory构建。
步骤 Step 由若干个小任务 Tasklet 组成,所以我们通过tasklet方法创建。tasklet方法接收一个Tasklet类型参数,Tasklet是一个函数是接口,源码如下:
public interface Tasklet {
    @Nullable
    RepeatStatus execute(StepContribution contribution, ChunkContext chunkContext) throws Exception;
}
所以我们可以使用 lambda 表达式创建一个匿名实现:
(contribution, chunkContext) -> {
    System.out.println("执行步骤....");
    return RepeatStatus.FINISHED;
}
该匿名实现必须返回一个明确的执行状态,这里返回RepeatStatus.FINISHED表示该小任务执行成功,正常结束。
此外,需要注意的是,我们配置的任务 Job 必须注册到 Spring IOC 容器中,并且任务的名称和步骤的名称组成唯一。比如上面的例子,我们的任务名称为 firstJob,步骤的名称为 step,如果存在别的任务和步骤组合也叫这个名称的话,则会执行失败。
启动项目,控制台打印日志如下:
...
2020-03-06 11:01:11.785  INFO 17324 --- [           main] o.s.b.c.l.support.SimpleJobLauncher      : Job: [SimpleJob: [name=firstJob]] launched with the following parameters: [{}]
2020-03-06 11:01:11.846  INFO 17324 --- [           main] o.s.batch.core.job.SimpleStepHandler     : Executing step: [step]
执行步骤....
2020-03-06 11:01:11.886  INFO 17324 --- [           main] o.s.batch.core.step.AbstractStep         : Step: [step] executed in 40ms
2020-03-06 11:01:11.909  INFO 17324 --- [           main] o.s.b.c.l.support.SimpleJobLauncher      : Job: [SimpleJob: [name=firstJob]] completed with the following parameters: [{}] and the following status: [COMPLETED] in 101ms
Reader,Writer,Processor,Tasklet 其实都是stepbuilder出来的,不过(Reader,Writer,Processor 是官方帮我们封装了而已)
可以看到,任务成功执行了,数据库的库表也将记录相关运行日志。
重新启动项目,控制台并不会再次打印出任务执行日志,因为 Job 名称和 Step 名称组成唯一,执行完的不可重复的任务,不会再次执行。
多步骤任务
一个复杂的任务一般包含多个步骤,下面举个多步骤任务的例子。在 job 包下新建MultiStepJobDemo类:
@Component
public class MultiStepJobDemo {

    @Autowired
    private JobBuilderFactory jobBuilderFactory;
    @Autowired
    private StepBuilderFactory stepBuilderFactory;

    @Bean
    public Job multiStepJob() {
        return jobBuilderFactory.get("multiStepJob")
                .start(step1())
                .next(step2())
                .next(step3())
                .build();
    }

    private Step step1() {
        return stepBuilderFactory.get("step1")
                .tasklet((stepContribution, chunkContext) -> {
                    System.out.println("执行步骤一操作。。。");
                    return RepeatStatus.FINISHED;
                }).build();
    }

    private Step step2() {
        return stepBuilderFactory.get("step2")
                .tasklet((stepContribution, chunkContext) -> {
                    System.out.println("执行步骤二操作。。。");
                    return RepeatStatus.FINISHED;
                }).build();
    }

    private Step step3() {
        return stepBuilderFactory.get("step3")
                .tasklet((stepContribution, chunkContext) -> {
                    System.out.println("执行步骤三操作。。。");
                    return RepeatStatus.FINISHED;
                }).build();
    }
}
上面代码中,我们通过step1()、step2()和step3()三个方法创建了三个步骤。Job 里要使用这些步骤,只需要通过JobBuilderFactory的start方法指定第一个步骤,然后通过next方法不断地指定下一个步骤即可。
启动项目,控制台打印日志如下:
2020-03-06 13:52:52.188  INFO 18472 --- [           main] o.s.b.c.l.support.SimpleJobLauncher      : Job: [SimpleJob: [name=multiStepJob]] launched with the following parameters: [{}]
2020-03-06 13:52:52.222  INFO 18472 --- [           main] o.s.batch.core.job.SimpleStepHandler     : Executing step: [step1]
执行步骤一操作。。。
2020-03-06 13:52:52.251  INFO 18472 --- [           main] o.s.batch.core.step.AbstractStep         : Step: [step1] executed in 29ms
2020-03-06 13:52:52.292  INFO 18472 --- [           main] o.s.batch.core.job.SimpleStepHandler     : Executing step: [step2]
执行步骤二操作。。。
2020-03-06 13:52:52.323  INFO 18472 --- [           main] o.s.batch.core.step.AbstractStep         : Step: [step2] executed in 30ms
2020-03-06 13:52:52.375  INFO 18472 --- [           main] o.s.batch.core.job.SimpleStepHandler     : Executing step: [step3]
执行步骤三操作。。。
2020-03-06 13:52:52.405  INFO 18472 --- [           main] o.s.batch.core.step.AbstractStep         : Step: [step3] executed in 29ms
2020-03-06 13:52:52.428  INFO 18472 --- [           main] o.s.b.c.l.support.SimpleJobLauncher      : Job: [SimpleJob: [name=multiStepJob]] completed with the following parameters: [{}] and the following status: [COMPLETED] in 231ms
三个步骤依次执行成功。
多个步骤在执行过程中也可以通过上一个步骤的执行状态来决定是否执行下一个步骤,修改上面的代码
@Component
public class MultiStepJobDemo {

    @Autowired
    private JobBuilderFactory jobBuilderFactory;
    @Autowired
    private StepBuilderFactory stepBuilderFactory;

    @Bean
    public Job multiStepJob() {
        return jobBuilderFactory.get("multiStepJob2")
                .start(step1())
                .on(ExitStatus.COMPLETED.getExitCode()).to(step2())
                .from(step2())
                .on(ExitStatus.COMPLETED.getExitCode()).to(step3())
                .from(step3()).end()
                .build();
    }

    private Step step1() {
        return stepBuilderFactory.get("step1")
                .tasklet((stepContribution, chunkContext) -> {
                    System.out.println("执行步骤一操作。。。");
                    return RepeatStatus.FINISHED;
                }).build();
    }

    private Step step2() {
        return stepBuilderFactory.get("step2")
                .tasklet((stepContribution, chunkContext) -> {
                    System.out.println("执行步骤二操作。。。");
                    return RepeatStatus.FINISHED;
                }).build();
    }

    private Step step3() {
        return stepBuilderFactory.get("step3")
                .tasklet((stepContribution, chunkContext) -> {
                    System.out.println("执行步骤三操作。。。");
                    return RepeatStatus.FINISHED;
                }).build();
    }
}
multiStepJob()方法的含义是:multiStepJob2 任务先执行 step1,当 step1 状态为完成时,接着执行 step2,当 step2 的状态为完成时,接着执行 step3。ExitStatus.COMPLETED常量表示任务顺利执行完毕,正常退出,该类还包含以下几种退出状态:
public class ExitStatus implements Serializable, Comparable<ExitStatus> {

    /**
     * Convenient constant value representing unknown state - assumed not
     * continuable.
     */
    public static final ExitStatus UNKNOWN = new ExitStatus("UNKNOWN");

    /**
     * Convenient constant value representing continuable state where processing
     * is still taking place, so no further action is required. Used for
     * asynchronous execution scenarios where the processing is happening in
     * another thread or process and the caller is not required to wait for the
     * result.
     */
    public static final ExitStatus EXECUTING = new ExitStatus("EXECUTING");

    /**
     * Convenient constant value representing finished processing.
     */
    public static final ExitStatus COMPLETED = new ExitStatus("COMPLETED");

    /**
     * Convenient constant value representing job that did no processing (e.g.
     * because it was already complete).
     */
    public static final ExitStatus NOOP = new ExitStatus("NOOP");

    /**
     * Convenient constant value representing finished processing with an error.
     */
    public static final ExitStatus FAILED = new ExitStatus("FAILED");

    /**
     * Convenient constant value representing finished processing with
     * interrupted status.
     */
    public static final ExitStatus STOPPED = new ExitStatus("STOPPED");

    ...
}
启动项目,控制台日志打印如下:
2020-03-06 14:21:49.384  INFO 18745 --- [           main] o.s.b.c.l.support.SimpleJobLauncher      : Job: [FlowJob: [name=multiStepJob2]] launched with the following parameters: [{}]
2020-03-06 14:21:49.427  INFO 18745 --- [           main] o.s.batch.core.job.SimpleStepHandler     : Executing step: [step1]
执行步骤一操作。。。
2020-03-06 14:21:49.456  INFO 18745 --- [           main] o.s.batch.core.step.AbstractStep         : Step: [step1] executed in 29ms
2020-03-06 14:21:49.501  INFO 18745 --- [           main] o.s.batch.core.job.SimpleStepHandler     : Executing step: [step2]
执行步骤二操作。。。
2020-03-06 14:21:49.527  INFO 18745 --- [           main] o.s.batch.core.step.AbstractStep         : Step: [step2] executed in 26ms
2020-03-06 14:21:49.576  INFO 18745 --- [           main] o.s.batch.core.job.SimpleStepHandler     : Executing step: [step3]
执行步骤三操作。。。
2020-03-06 14:21:49.604  INFO 18745 --- [           main] o.s.batch.core.step.AbstractStep         : Step: [step3] executed in 28ms
2020-03-06 14:21:49.629  INFO 18745 --- [           main] o.s.b.c.l.support.SimpleJobLauncher      : Job: [FlowJob: [name=multiStepJob2]] completed with the following parameters: [{}] and the following status: [COMPLETED] in 238ms
Flow 的用法
Flow 的作用就是可以将多个步骤 Step 组合在一起然后再组装到任务 Job 中。举个 Flow 的例子,在 job 包下新建FlowJobDemo类:
@Component
public class FlowJobDemo {

    @Autowired
    private JobBuilderFactory jobBuilderFactory;
    @Autowired
    private StepBuilderFactory stepBuilderFactory;

    @Bean
    public Job flowJob() {
        return jobBuilderFactory.get("flowJob")
                .start(flow())
                .next(step3())
                .end()
                .build();
    }

    private Step step1() {
        return stepBuilderFactory.get("step1")
                .tasklet((stepContribution, chunkContext) -> {
                    System.out.println("执行步骤一操作。。。");
                    return RepeatStatus.FINISHED;
                }).build();
    }

    private Step step2() {
        return stepBuilderFactory.get("step2")
                .tasklet((stepContribution, chunkContext) -> {
                    System.out.println("执行步骤二操作。。。");
                    return RepeatStatus.FINISHED;
                }).build();
    }

    private Step step3() {
        return stepBuilderFactory.get("step3")
                .tasklet((stepContribution, chunkContext) -> {
                    System.out.println("执行步骤三操作。。。");
                    return RepeatStatus.FINISHED;
                }).build();
    }

    // 创建一个flow对象,包含若干个step
    private Flow flow() {
        return new FlowBuilder<Flow>("flow")
                .start(step1())
                .next(step2())
                .build();
    }
}
上面代码中,我们通过FlowBuilder将 step1 和 step2 组合在一起,创建了一个名为 flow 的 Flow,然后再将其赋给任务 Job。使用 Flow 和 Step 构建 Job 的区别是,Job 流程中包含 Flow 类型的时候需要在build()方法前调用end()方法。
启动程序,控制台日志打印如下
2020-03-06 14:36:42.621  INFO 18865 --- [           main] o.s.b.c.l.support.SimpleJobLauncher      : Job: [FlowJob: [name=flowJob]] launched with the following parameters: [{}]
2020-03-06 14:36:42.667  INFO 18865 --- [           main] o.s.batch.core.job.SimpleStepHandler     : Executing step: [step1]
执行步骤一操作。。。
2020-03-06 14:36:42.697  INFO 18865 --- [           main] o.s.batch.core.step.AbstractStep         : Step: [step1] executed in 30ms
2020-03-06 14:36:42.744  INFO 18865 --- [           main] o.s.batch.core.job.SimpleStepHandler     : Executing step: [step2]
执行步骤二操作。。。
2020-03-06 14:36:42.771  INFO 18865 --- [           main] o.s.batch.core.step.AbstractStep         : Step: [step2] executed in 27ms
2020-03-06 14:36:42.824  INFO 18865 --- [           main] o.s.batch.core.job.SimpleStepHandler     : Executing step: [step3]
执行步骤三操作。。。
2020-03-06 14:36:42.850  INFO 18865 --- [           main] o.s.batch.core.step.AbstractStep         : Step: [step3] executed in 25ms
2020-03-06 14:36:42.874  INFO 18865 --- [           main] o.s.b.c.l.support.SimpleJobLauncher      : Job: [FlowJob: [name=flowJob]] completed with the following parameters: [{}] and the following status: [COMPLETED] in 245ms
并行执行
任务中的步骤除了可以串行执行(一个接着一个执行)外,还可以并行执行,并行执行在特定的业务需求下可以提供任务执行效率。
将任务并行化只需两个简单步骤:
- 将步骤 Step 转换为 Flow;
- 任务 Job 中指定并行 Flow。
举个例子,在 job 包下新建SplitJobDemo类:
@Component
public class SplitJobDemo {

    @Autowired
    private JobBuilderFactory jobBuilderFactory;
    @Autowired
    private StepBuilderFactory stepBuilderFactory;

    @Bean
    public Job splitJob() {
        return jobBuilderFactory.get("splitJob")
                .start(flow1())
                .split(new SimpleAsyncTaskExecutor()).add(flow2())
                .end()
                .build();

    }

    private Step step1() {
        return stepBuilderFactory.get("step1")
                .tasklet((stepContribution, chunkContext) -> {
                    System.out.println("执行步骤一操作。。。");
                    return RepeatStatus.FINISHED;
                }).build();
    }

    private Step step2() {
        return stepBuilderFactory.get("step2")
                .tasklet((stepContribution, chunkContext) -> {
                    System.out.println("执行步骤二操作。。。");
                    return RepeatStatus.FINISHED;
                }).build();
    }

    private Step step3() {
        return stepBuilderFactory.get("step3")
                .tasklet((stepContribution, chunkContext) -> {
                    System.out.println("执行步骤三操作。。。");
                    return RepeatStatus.FINISHED;
                }).build();
    }

    private Flow flow1() {
        return new FlowBuilder<Flow>("flow1")
                .start(step1())
                .next(step2())
                .build();
    }

    private Flow flow2() {
        return new FlowBuilder<Flow>("flow2")
                .start(step3())
                .build();
    }
}
上面例子中,我们创建了两个 Flow:flow1(包含 step1 和 step2)和 flow2(包含 step3)。然后通过JobBuilderFactory的split方法,指定一个异步执行器,将 flow1 和 flow2 异步执行(也就是并行)。
启动项目,控制台日志打印如下:
2020-03-06 15:25:43.602  INFO 19449 --- [           main] o.s.b.c.l.support.SimpleJobLauncher      : Job: [FlowJob: [name=splitJob]] launched with the following parameters: [{}]
2020-03-06 15:25:43.643  INFO 19449 --- [cTaskExecutor-1] o.s.batch.core.job.SimpleStepHandler     : Executing step: [step3]
2020-03-06 15:25:43.650  INFO 19449 --- [cTaskExecutor-2] o.s.batch.core.job.SimpleStepHandler     : Executing step: [step1]
执行步骤三操作。。。
执行步骤一操作。。。
2020-03-06 15:25:43.673  INFO 19449 --- [cTaskExecutor-2] o.s.batch.core.step.AbstractStep         : Step: [step1] executed in 23ms
2020-03-06 15:25:43.674  INFO 19449 --- [cTaskExecutor-1] o.s.batch.core.step.AbstractStep         : Step: [step3] executed in 31ms
2020-03-06 15:25:43.714  INFO 19449 --- [cTaskExecutor-2] o.s.batch.core.job.SimpleStepHandler     : Executing step: [step2]
执行步骤二操作。。。
2020-03-06 15:25:43.738  INFO 19449 --- [cTaskExecutor-2] o.s.batch.core.step.AbstractStep         : Step: [step2] executed in 24ms
2020-03-06 15:25:43.758  INFO 19449 --- [           main] o.s.b.c.l.support.SimpleJobLauncher      : Job: [FlowJob: [name=splitJob]] completed with the following parameters: [{}] and the following status: [COMPLETED] in 146ms
可以看到 step3 并没有在 step2 后才执行,说明步骤已经是并行化的(开启并行化后,并行的步骤执行顺序并不能 100%确定,因为线程调度具有不确定性)。
任务决策器
决策器的作用就是可以指定程序在不同的情况下运行不同的任务流程,比如今天是周末,则让任务执行 step1 和 step2,如果是工作日,则之心 step1 和 step3。
使用决策器前,我们需要自定义一个决策器的实现。在 com.jinlong.batch 包下新建 decider 包,然后创建MyDecider类,实现JobExecutionDecider接口:
@Component
public class MyDecider implements JobExecutionDecider {
    @Override
    public FlowExecutionStatus decide(JobExecution jobExecution, StepExecution stepExecution) {
        LocalDate now = LocalDate.now();
        DayOfWeek dayOfWeek = now.getDayOfWeek();

        if (dayOfWeek == DayOfWeek.SATURDAY || dayOfWeek == DayOfWeek.SUNDAY) {
            return new FlowExecutionStatus("weekend");
        } else {
            return new FlowExecutionStatus("workingDay");
        }
    }
}
MyDecider实现JobExecutionDecider接口的decide方法,该方法返回FlowExecutionStatus。上面的逻辑是:判断今天是否是周末,如果是,返回FlowExecutionStatus("weekend")状态,否则返回FlowExecutionStatus("workingDay")状态。
下面演示如何在任务 Job 里使用决策器。在 job 包下新建DeciderJobDemo:
@Component
public class DeciderJobDemo {

    @Autowired
    private JobBuilderFactory jobBuilderFactory;
    @Autowired
    private StepBuilderFactory stepBuilderFactory;
    @Autowired
    private MyDecider myDecider;

    @Bean
    public Job deciderJob() {
        return jobBuilderFactory.get("deciderJob")
                .start(step1())
                .next(myDecider)
                .from(myDecider).on("weekend").to(step2())
                .from(myDecider).on("workingDay").to(step3())
                .from(step3()).on("*").to(step4())
                .end()
                .build();
    }

    private Step step1() {
        return stepBuilderFactory.get("step1")
                .tasklet((stepContribution, chunkContext) -> {
                    System.out.println("执行步骤一操作。。。");
                    return RepeatStatus.FINISHED;
                }).build();
    }

    private Step step2() {
        return stepBuilderFactory.get("step2")
                .tasklet((stepContribution, chunkContext) -> {
                    System.out.println("执行步骤二操作。。。");
                    return RepeatStatus.FINISHED;
                }).build();
    }

    private Step step3() {
        return stepBuilderFactory.get("step3")
                .tasklet((stepContribution, chunkContext) -> {
                    System.out.println("执行步骤三操作。。。");
                    return RepeatStatus.FINISHED;
                }).build();
    }


    private Step step4() {
        return stepBuilderFactory.get("step4")
                .tasklet((stepContribution, chunkContext) -> {
                    System.out.println("执行步骤四操作。。。");
                    return RepeatStatus.FINISHED;
                }).build();
    }
}
上面代码中,我们注入了自定义决策器MyDecider,然后在jobDecider()方法里使用了该决策器:
@Bean
public Job deciderJob() {
    return jobBuilderFactory.get("deciderJob")
            .start(step1())
            .next(myDecider)
            .from(myDecider).on("weekend").to(step2())
            .from(myDecider).on("workingDay").to(step3())
            .from(step3()).on("*").to(step4())
            .end()
            .build();
}
这段代码的含义是:任务 deciderJob 首先执行 step1,然后指定自定义决策器,如果决策器返回 weekend,那么执行 step2,如果决策器返回 workingDay,那么执行 step3。如果执行了 step3,那么无论 step3 的结果是什么,都将执行 step4。
启动项目,控制台输出如下所示:
2020-03-06 16:09:10.541  INFO 19873 --- [           main] o.s.b.c.l.support.SimpleJobLauncher      : Job: [FlowJob: [name=deciderJob]] launched with the following parameters: [{}]
2020-03-06 16:09:10.609  INFO 19873 --- [           main] o.s.batch.core.job.SimpleStepHandler     : Executing step: [step1]
执行步骤一操作。。。
2020-03-06 16:09:10.641  INFO 19873 --- [           main] o.s.batch.core.step.AbstractStep         : Step: [step1] executed in 32ms
2020-03-06 16:09:10.692  INFO 19873 --- [           main] o.s.batch.core.job.SimpleStepHandler     : Executing step: [step3]
执行步骤三操作。。。
2020-03-06 16:09:10.723  INFO 19873 --- [           main] o.s.batch.core.step.AbstractStep         : Step: [step3] executed in 31ms
2020-03-06 16:09:10.769  INFO 19873 --- [           main] o.s.batch.core.job.SimpleStepHandler     : Executing step: [step4]
执行步骤四操作。。。
2020-03-06 16:09:10.797  INFO 19873 --- [           main] o.s.batch.core.step.AbstractStep         : Step: [step4] executed in 27ms
2020-03-06 16:09:10.818  INFO 19873 --- [           main] o.s.b.c.l.support.SimpleJobLauncher      : Job: [FlowJob: [name=deciderJob]] completed with the following parameters: [{}] and the following status: [COMPLETED] in 256ms
任务嵌套
任务 Job 除了可以由 Step 或者 Flow 构成外,我们还可以将多个任务 Job 转换为特殊的 Step,然后再赋给另一个任务 Job,这就是任务的嵌套。
举个例子,在 job 包下新建NestedJobDemo类:
@Component
public class NestedJobDemo {

    @Autowired
    private JobBuilderFactory jobBuilderFactory;
    @Autowired
    private StepBuilderFactory stepBuilderFactory;
    @Autowired
    private JobLauncher jobLauncher;
    @Autowired
    private JobRepository jobRepository;
    @Autowired
    private PlatformTransactionManager platformTransactionManager;

    // 父任务
    @Bean
    public Job parentJob() {
        return jobBuilderFactory.get("parentJob")
                .start(childJobOneStep())
                .next(childJobTwoStep())
                .build();
    }


    // 将任务转换为特殊的步骤
    private Step childJobOneStep() {
        return new JobStepBuilder(new StepBuilder("childJobOneStep"))
                .job(childJobOne())
                .launcher(jobLauncher)
                .repository(jobRepository)
                .transactionManager(platformTransactionManager)
                .build();
    }

    // 将任务转换为特殊的步骤
    private Step childJobTwoStep() {
        return new JobStepBuilder(new StepBuilder("childJobTwoStep"))
                .job(childJobTwo())
                .launcher(jobLauncher)
                .repository(jobRepository)
                .transactionManager(platformTransactionManager)
                .build();
    }

    // 子任务一
    private Job childJobOne() {
        return jobBuilderFactory.get("childJobOne")
                .start(
                    stepBuilderFactory.get("childJobOneStep")
                            .tasklet((stepContribution, chunkContext) -> {
                                System.out.println("子任务一执行步骤。。。");
                                return RepeatStatus.FINISHED;
                            }).build()
                ).build();
    }

    // 子任务二
    private Job childJobTwo() {
        return jobBuilderFactory.get("childJobTwo")
                .start(
                    stepBuilderFactory.get("childJobTwoStep")
                            .tasklet((stepContribution, chunkContext) -> {
                                System.out.println("子任务二执行步骤。。。");
                                return RepeatStatus.FINISHED;
                            }).build()
                ).build();
    }
}
上面代码中,我们通过childJobOne()和childJobTwo()方法创建了两个任务 Job,这里没什么好说的,前面都介绍过。关键在于childJobOneStep()方法和childJobTwoStep()方法。在childJobOneStep()方法中,我们通过JobStepBuilder构建了一个名称为childJobOneStep的 Step,顾名思义,它是一个任务型 Step 的构造工厂,可以将任务转换为“特殊”的步骤。在构建过程中,我们还需要传入任务执行器 JobLauncher、任务仓库 JobRepository 和事务管理器 PlatformTransactionManager。
将任务转换为特殊的步骤后,将其赋给父任务 parentJob 即可,流程和前面介绍的一致。
配置好后,启动项目,控制台输出如下所示:
2020-03-06 16:58:39.771  INFO 21588 --- [           main] o.s.b.c.l.support.SimpleJobLauncher      : Job: [SimpleJob: [name=parentJob]] launched with the following parameters: [{}]
2020-03-06 16:58:39.812  INFO 21588 --- [           main] o.s.batch.core.job.SimpleStepHandler     : Executing step: [childJobOneStep]
2020-03-06 16:58:39.866  INFO 21588 --- [           main] o.s.b.c.l.support.SimpleJobLauncher      : Job: [SimpleJob: [name=childJobOne]] launched with the following parameters: [{}]
2020-03-06 16:58:39.908  INFO 21588 --- [           main] o.s.batch.core.job.SimpleStepHandler     : Executing step: [childJobOneStep]
子任务一执行步骤。。。
2020-03-06 16:58:39.940  INFO 21588 --- [           main] o.s.batch.core.step.AbstractStep         : Step: [childJobOneStep] executed in 32ms
2020-03-06 16:58:39.960  INFO 21588 --- [           main] o.s.b.c.l.support.SimpleJobLauncher      : Job: [SimpleJob: [name=childJobOne]] completed with the following parameters: [{}] and the following status: [COMPLETED] in 86ms
2020-03-06 16:58:39.983  INFO 21588 --- [           main] o.s.batch.core.step.AbstractStep         : Step: [childJobOneStep] executed in 171ms
2020-03-06 16:58:40.019  INFO 21588 --- [           main] o.s.batch.core.job.SimpleStepHandler     : Executing step: [childJobTwoStep]
2020-03-06 16:58:40.067  INFO 21588 --- [           main] o.s.b.c.l.support.SimpleJobLauncher      : Job: [SimpleJob: [name=childJobTwo]] launched with the following parameters: [{}]
2020-03-06 16:58:40.102  INFO 21588 --- [           main] o.s.batch.core.job.SimpleStepHandler     : Executing step: [childJobTwoStep]
子任务二执行步骤。。。
2020-03-06 16:58:40.130  INFO 21588 --- [           main] o.s.batch.core.step.AbstractStep         : Step: [childJobTwoStep] executed in 28ms
2020-03-06 16:58:40.152  INFO 21588 --- [           main] o.s.b.c.l.support.SimpleJobLauncher      : Job: [SimpleJob: [name=childJobTwo]] completed with the following parameters: [{}] and the following status: [COMPLETED] in 75ms
2020-03-06 16:58:40.157  INFO 21588 --- [           main] o.s.batch.core.step.AbstractStep         : Step: [childJobTwoStep] executed in 138ms
2020-03-06 16:58:40.177  INFO 21588 --- [           main] o.s.b.c.l.support.SimpleJobLauncher      : Job: [SimpleJob: [name=parentJob]] completed with the following parameters: [{}] and the following status: [COMPLETED] in 398ms
Q.E.D.