


安装环境
- 下载VMware16,RedHat7.3 (买了百度网盘会员,( •̀ ω •́ ))
- 配置ip cd /etc/sysconfig/network-scripts vi ifcfg-ens33
TYPE=Ethernet
BOOTPROTO=static # 不使用DHCP分配ip
DEFROUTE=yes
PEERDNS=yes
PEERROUTES=yes
IPV4_FAILURE_FATAL=no
IPV6INIT=yes
IPV6_AUTOCONF=yes
IPV6_DEFROUTE=yes
IPV6_PEERDNS=yes
IPV6_PEERROUTES=yes
IPV6_FAILURE_FATAL=no
IPV6_ADDR_GEN_MODE=stable-privacy
NAME=ens33
UUID=219aa420-634f-4ee7-946e-e50555ce7009
DEVICE=ens33
ONBOOT=yes #开机启动
IPADDR=192.168.107.110 #ip 要配在和vmware8 nat 一个网段
NETMASK=255.255.255.0 #子网掩码
GATEWAY=192.168.107.2 # 网关 vmware nat 网关
DNS1=8.8.8.8 #DNS 访问外网解析域名
- 更新配置 service network restart
- 测试 外网,内网 是否联通
- 克隆3台 110,111,112
安装docker
- 下载 https://download.docker.com/linux/static/stable/x86_64/ docker-19.03.15.tgz
- 上传 docker-19.03.15.tgz 到服务器
- 解压 tar -zxvf docker-19.03.15.tgz
- 移动 cp docker/* /usr/bin/
- 在/etc/systemd/system/目录下新增docker.service文件,内容如下,这样可以将docker注册为service服务
[Unit]
Description=Docker Application Container Engine
Documentation=https://docs.docker.com
After=network-online.target firewalld.service
Wants=network-online.target

[Service]
Type=notify
# the default is not to use systemd for cgroups because the delegate issues still
# exists and systemd currently does not support the cgroup feature set required
# for containers run by docker
ExecStart=/usr/bin/dockerd --selinux-enabled=false --insecure-registry=127.0.0.1
ExecReload=/bin/kill -s HUP $MAINPID
# Having non-zero Limit*s causes performance problems due to accounting overhead
# in the kernel. We recommend using cgroups to do container-local accounting.
LimitNOFILE=infinity
LimitNPROC=infinity
LimitCORE=infinity
# Uncomment TasksMax if your systemd version supports it.
# Only systemd 226 and above support this version.
#TasksMax=infinity
TimeoutStartSec=0
# set delegate yes so that systemd does not reset the cgroups of docker containers
Delegate=yes
# kill only the docker process, not all processes in the cgroup
KillMode=process
# restart the docker process if it exits prematurely
Restart=on-failure
StartLimitBurst=3
StartLimitInterval=60s

[Install]
WantedBy=multi-user.target
此处的--insecure-registry=127.0.0.1(此处改成你私服ip)设置是针对有搭建了自己私服Harbor时允许docker进行不安全的访问,否则访问将会被拒绝。
启动docker
- 给docker.service文件添加执行权限
chmod +x /etc/systemd/system/docker.service
重新加载配置文件(每次有修改docker.service文件时都要重新加载下)
systemctl daemon-reload
- 启动
systemctl start docker
- 设置开机启动
systemctl enable docker.service
- 查看docker服务状态
systemctl status docker
- 关闭防火墙
systemctl status firewalld
systemctl stop firewalld
systemctl disable firewalld
- 关闭selinux
vi /etc/selinux/config SELINUX=disabled(不是SELINUXTYPE)
安装gogs
- 首先需要下载Gogs的Docker镜像
docker pull gogs/gogs
- 下载完成后在Docker容器中运行Gogs;
docker run -p 10044:22 -p 10000:3000 --name=gogs \
-e TZ="Asia/Shanghai" \
-v /mydata/gogs:/data  \
-d gogs/gogs
- 第一运行需要配置(别瞎配深受其害)
https://github.com/gogs/gogs/tree/main/docker
Drone安装
接下来我们安装下Drone,不愧是基于容器的CI/DI工具,使用Docker安装很方便!
- 首先下载Drone的Server和Runner的镜像;
# Drone的Server
docker pull drone/drone:1
# Drone的Runner
docker pull drone-runner-docker:1
- 这里有个Server和Runner的概念,我们先来理解下;
- Server:为Drone的管理提供了Web页面,用于管理从Git上获取的仓库中的流水线任务。
- Runner:一个单独的守护进程,会轮询Server,获取需要执行的流水线任务,之后执行。
- 接下来我们来安装drone-server,使用如下命令即可;
docker run \
  -v /mydata/drone:/data \
  -e DRONE_AGENTS_ENABLED=true \
  -e DRONE_GOGS_SERVER=http://192.168.107.110:10000 \
  -e DRONE_RPC_SECRET=dronerpc666 \
  -e DRONE_SERVER_HOST=192.168.107.111:3080 \
  -e DRONE_SERVER_PROTO=http \
  -e DRONE_USER_CREATE=username:kenny,admin:true \
  -e TZ="Asia/Shanghai" \
  -p 3080:80 \
  --restart=always \
  --detach=true \
  --name=drone \
  drone/drone:1
-
这里的配置参数比较多,下面统一解释下;
- DRONE_GOGS_SERVER:用于配置Gogs服务地址。
- DRONE_RPC_SECRET:Drone的共享秘钥,用于验证连接到server的rpc连接,server和runner需要提供同样的秘钥。
- DRONE_SERVER_HOST:用于配置Drone server外部可访问的地址。
- DRONE_SERVER_PROTO:用于配置Drone server外部可访问的协议,必须是http或https。
- DRONE_USER_CREATE:创建一个管理员账号,该账号需要在Gogs中注册好。(admin的意思是管理员,不是用户密码)
- 接下来安装drone-runner-docker,当有需要执行的任务时,会启动临时的容器来执行流水线任务;
docker run -d \
  -v /var/run/docker.sock:/var/run/docker.sock \
  -e DRONE_RPC_PROTO=http \
  -e DRONE_RPC_HOST=192.168.107.111:3080 \
  -e DRONE_RPC_SECRET=dronerpc666 \
  -e DRONE_RUNNER_CAPACITY=2 \
  -e DRONE_RUNNER_NAME=runner-docker \
  -e TZ="Asia/Shanghai" \
  -p 3000:3000 \
  --restart always \
  --name runner-docker \
  drone/drone-runner-docker:1
- 这里的配置参数比较多,下面统一解释下。
- DRONE_RPC_PROTO:用于配置连接到Drone server的协议,必须是http或https。
- DRONE_RPC_HOST:用于配置Drone server的访问地址,runner会连接到server获取流水线任务并执行。
- DRONE_RPC_SECRET:用于配置连接到Drone server的共享秘钥。
- DRONE_RUNNER_CAPACITY:限制runner并发执行的流水线任务数量。
- DRONE_RUNNER_NAME:自定义runner的名称。
Drone使用
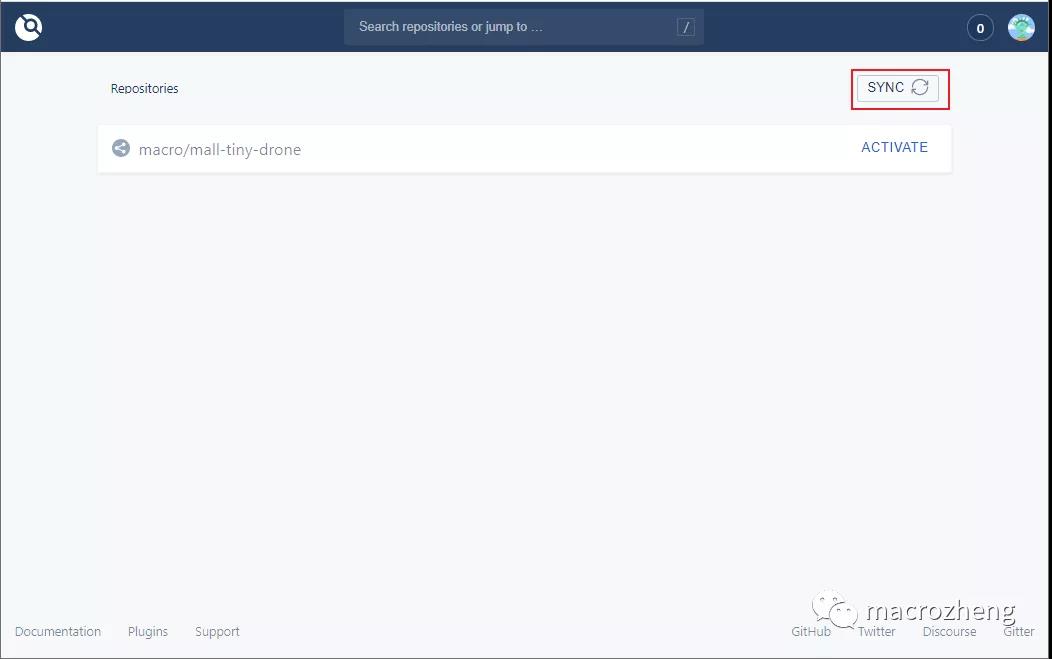
- 让我们来访问下Drone的控制台页面,第一次登录需要输入账号密码(在Gogs中注册的账号),访问地址:http://192.168.107.111:3080/

- 此时我们在Gogs中的项目会现在在列表中,如果没有的话可以点下SYNC按钮;
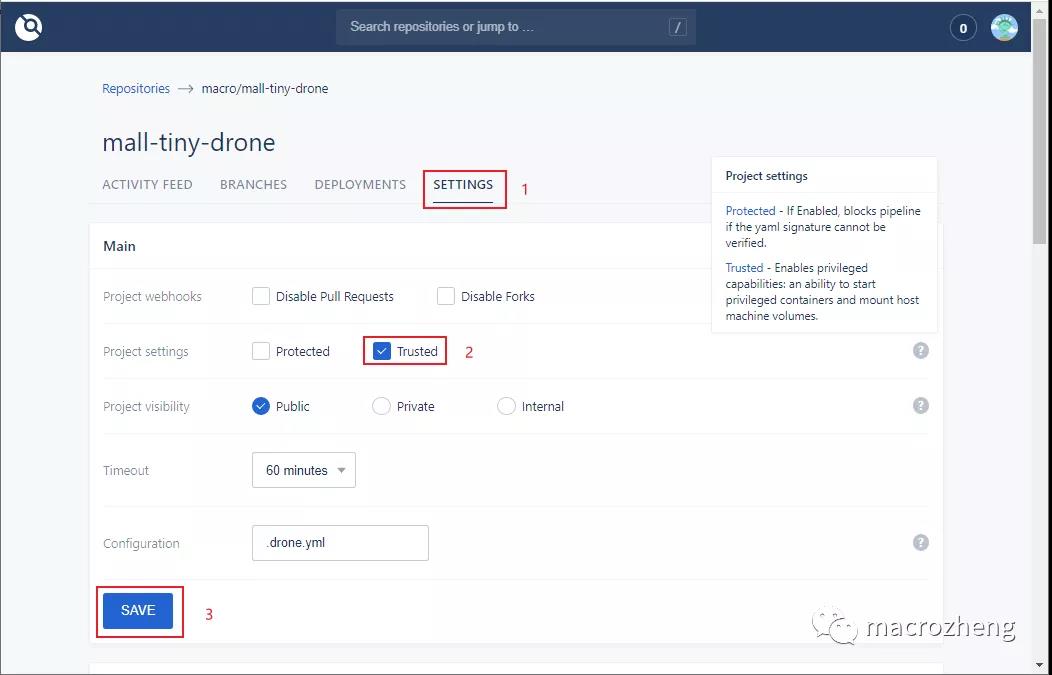
- 接下来我们需要对仓库进行设置,将仓库设置为Trusted(否则Drone创建的容器无法挂载目录到宿主机),最后点击SAVE按钮保存;(如果没有Trusted则代表不是管理员用户)
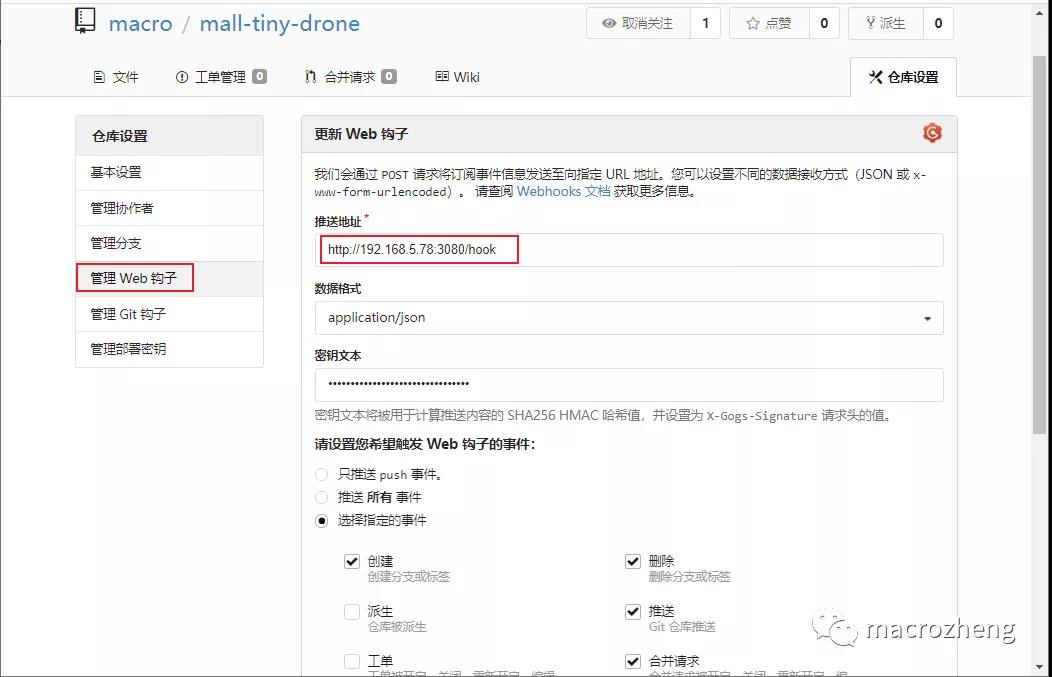
- 保存成功后会在Gogs中自动配置一个Web钩子,当我们推送代码到Gogs中去时,会触发这个钩子,然后执行在Drone中的流水线任务;
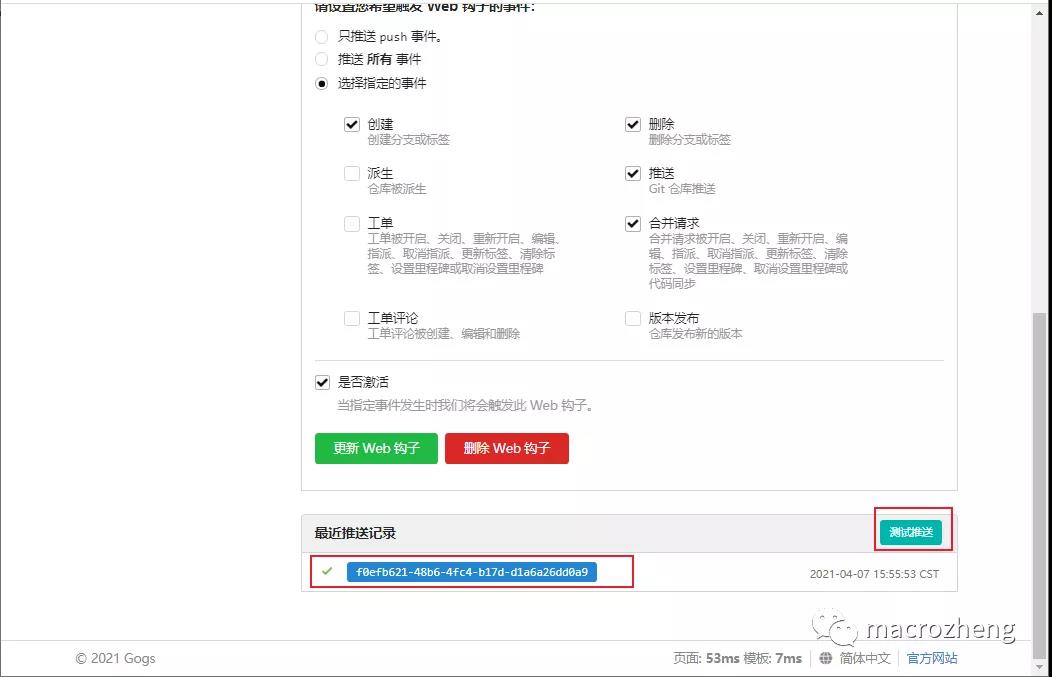
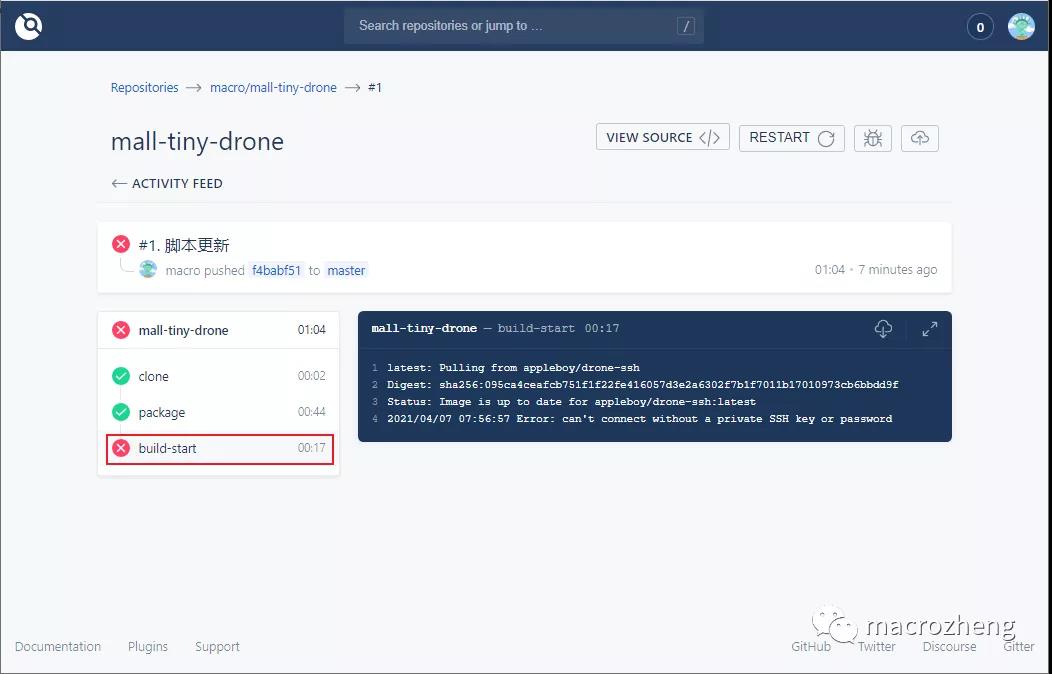
- 拉到最下面,我们可以发送一个测试推送,推送成功会显示绿色的√;
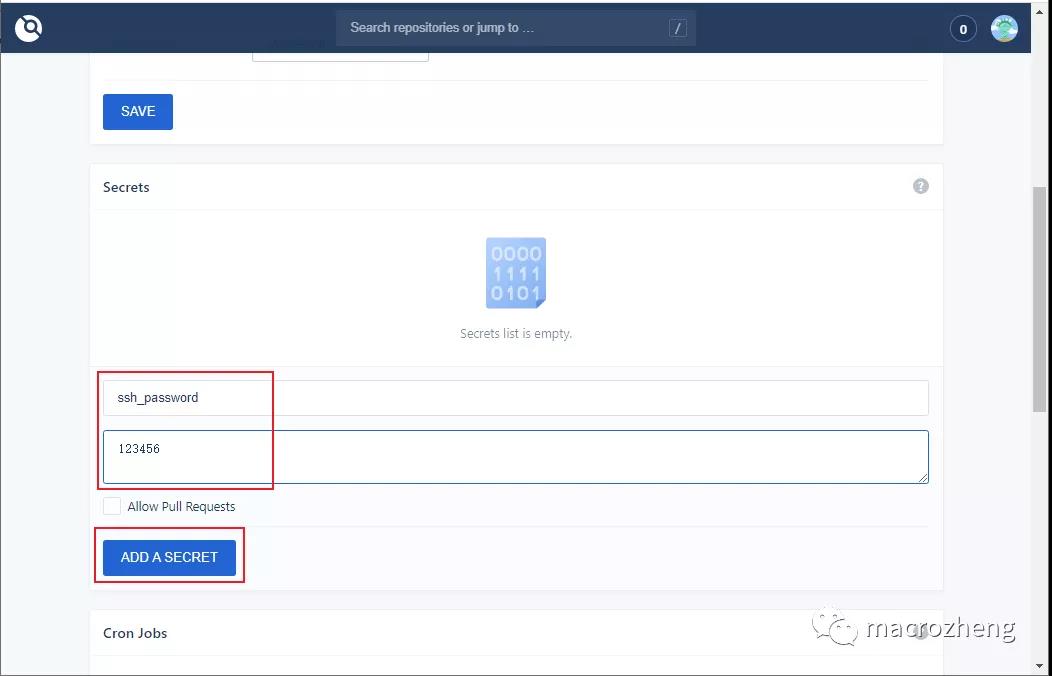
- 此时我们在Drone中发现其实流水线执行失败了,那是因为我们在脚本中引用了Secret中的ssh_password;
- 在仓库的设置中添加一个Secret即可,Secret是专门用来存储密码的,此密码只能被使用或删除,无法被查看;
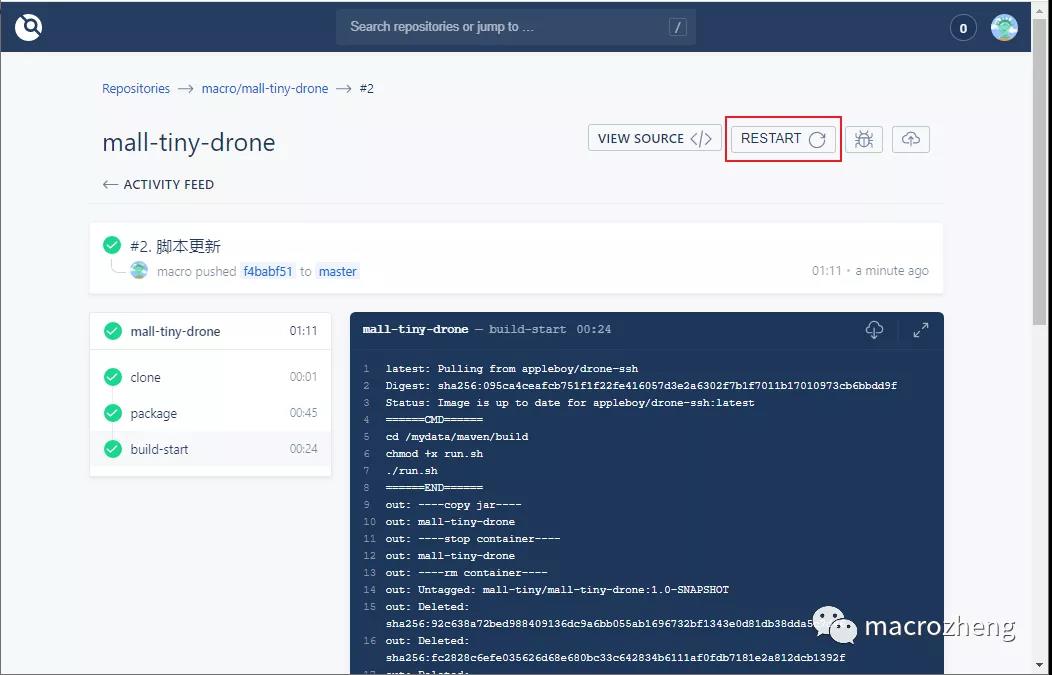
- 在ACTIVITY FEED中使用RESTART可以重新执行该流水线,发现已经成功执行。
编写脚本
当我们向Git仓库Push代码时,会自动触发Web钩子,然后Drone就会从Git仓库Clone代码,再通过项目目录下的.drone.yml配置,执行相应的流水线,接下来我们来看看这个脚本是如何写的。
- 首先我们来了解下在.drone.yml中配置的工作流都有哪些操作,看下流程图就知道了;(重点)
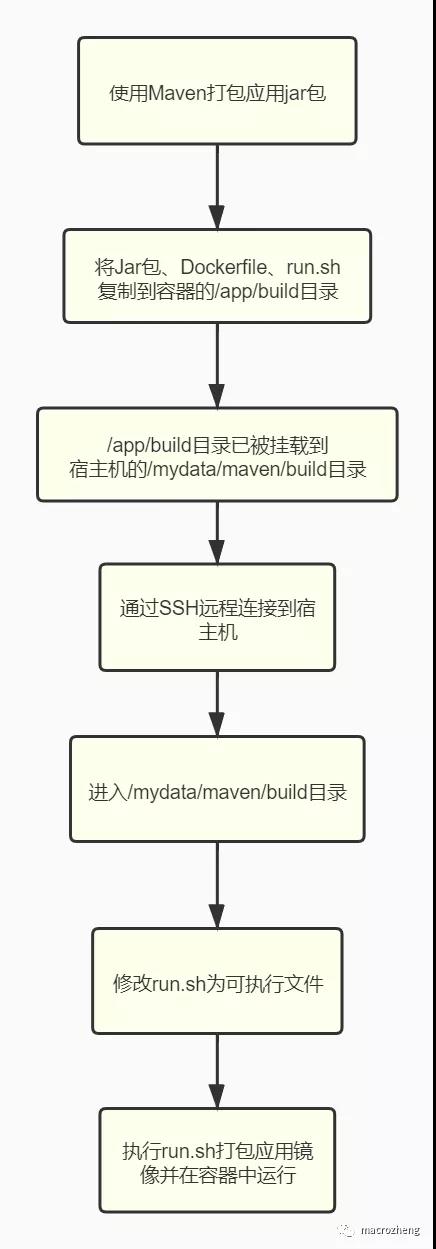
- 再来一个完整的.drone.yml,配上详细的注解,看下就基本懂了!
kind: pipeline # 定义对象类型,还有secret和signature两种类型
type: docker # 定义流水线类型,还有kubernetes、exec、ssh等类型
name: demo-drone # 定义流水线名称

steps: # 定义流水线执行步骤,这些步骤将顺序执行
  - name: package # 流水线名称
    image: maven:3-jdk-8 # 定义创建容器的Docker镜像
    pull: if-not-exists  #提升效率,默认always
    volumes: # 将容器内目录挂载到宿主机,仓库需要开启Trusted设置
      - name: maven-cache
        path: /root/.m2 # 将maven下载依赖的目录挂载出来,防止重复下载
      - name: maven-build
        path: /app/build # 将应用打包好的Jar和执行脚本挂载出来
    commands: # 定义在Docker容器中执行的shell命令
      - mvn clean package # 应用打包命令
      - cp target/demo-0.0.1-SNAPSHOT.jar /app/build/demo-0.0.1-SNAPSHOT.jar
      - cp Dockerfile /app/build/Dockerfile
      - cp run.sh /app/build/run.sh

  - name: build-start
    image: appleboy/drone-ssh # SSH工具镜像
    pull: if-not-exists
    settings:
      host: 192.168.107.112 # 远程连接地址
      username: root # 远程连接账号
      password: root
#        from_secret: ssh_password # 从Secret中读取SSH密码
      port: 22 # 远程连接端口
      command_timeout: 5m # 远程执行命令超时时间
      script:
        - cd /mydata/maven/build # 进入宿主机构建目录
        - chmod +x run.sh # 更改为可执行脚本
        - ./run.sh # 运行脚本打包应用镜像并运行

  - name: dingTalk notification #钉钉通知
    pull: if-not-exists
    image: lddsb/drone-dingtalk-message:latest
    settings:
      token:
        from_secret: dingtalk_token #机器人呢token
      type: markdown
      message_color: true
      message_pic: true
      sha_link: true
    when:
      status: [failure, success]

volumes: # 定义流水线挂载目录,用于共享数据
  - name: maven-build
    host:
      path: /mydata/maven/build # 从宿主机中挂载的目录
  - name: maven-cache
    host:
      path: /mydata/maven/cache
- run.sh执行脚本可以实现打包应用和运行容器镜像
#!/usr/bin/env bash
# 定义应用组名
group_name='mall-tiny'
# 定义应用名称
app_name='mall-tiny-drone'
# 定义应用版本
app_version='1.0-SNAPSHOT'
# 定义应用环境
profile_active='prod'
echo '----copy jar----'
docker stop ${app_name}
echo '----stop container----'
docker rm ${app_name}
echo '----rm container----'
docker rmi ${group_name}/${app_name}:${app_version}
echo '----rm image----'
# 打包编译docker镜像
docker build -t ${group_name}/${app_name}:${app_version} .
echo '----build image----'
docker run -p 8088:8088 --name ${app_name} \
-e TZ="Asia/Shanghai" \
-v /etc/localtime:/etc/localtime \
-v /mydata/app/${app_name}/logs:/var/logs \
-d ${group_name}/${app_name}:${app_version}
echo '----start container----'
- Dockerfile 打镜像
# 该镜像需要依赖的基础镜像这个基础镜像小
FROM openjdk:8-jdk-alpine
# 将当前目录下的jar包复制到docker容器的/目录下
ADD demo-0.0.1-SNAPSHOT.jar /app.jar
# 声明服务运行在8080端口
EXPOSE 8088
# 指定docker容器启动时运行jar包
ENTRYPOINT ["java", "-jar","/app.jar"]
# 指定维护者的名字
MAINTAINER macrozheng
- drone和dockerfile需要的镜像整理
mall-tiny/mall-tiny-drone      1.0-SNAPSHOT              122MB #app
maven                          3-jdk-8                   537MB
openjdk                        8-jre                     273MB
lddsb/drone-dingtalk-message   latest                    15MB #钉钉
drone/git                      latest                    198MB
drone/drone-runner-docker      1                         26.3MB
appleboy/drone-ssh             latest                    13.6MB
drone/drone                    1                         67.3MB
openjdk                        8-jdk-alpine              105MB #这个jdk最小
java                           8                         643MB
Swarm+Docker+Portainer(集群,图形化)
修改Docker启动参数
- 修改docker的启动参数(三个节点均操作)
vi /etc/systemd/system/docker.service
- 加入以下参数
-H tcp://0.0.0.0:2375 -H unix:///var/run/docker.sock
[Unit]
Description=Docker Application Container Engine
Documentation=https://docs.docker.com
After=network-online.target firewalld.service
Wants=network-online.target

[Service]
Type=notify
# the default is not to use systemd for cgroups because the delegate issues still
# exists and systemd currently does not support the cgroup feature set required
# for containers run by docker
ExecStart=/usr/bin/dockerd --selinux-enabled=false --insecure-registry=127.0.0.1 -H tcp://0.0.0.0:2375 -H unix:///var/run/docker.sock
ExecReload=/bin/kill -s HUP $MAINPID
# Having non-zero Limit*s causes performance problems due to accounting overhead
# in the kernel. We recommend using cgroups to do container-local accounting.
LimitNOFILE=infinity
LimitNPROC=infinity
LimitCORE=infinity
# Uncomment TasksMax if your systemd version supports it.
# Only systemd 226 and above support this version.
#TasksMax=infinity
TimeoutStartSec=0
# set delegate yes so that systemd does not reset the cgroups of docker containers
Delegate=yes
# kill only the docker process, not all processes in the cgroup
KillMode=process
# restart the docker process if it exits prematurely
Restart=on-failure
StartLimitBurst=3
StartLimitInterval=60s

[Install]
WantedBy=multi-user.target
- 加载配置文件(重启docker),验证是否成功
systemctl daemon-reload
systemctl restart docker
systemctl status docker
- 查看是否有
tcp://0.0.0.0:2375 -H unix:///var/run/docker.sock
● docker.service - Docker Application Container Engine
   Loaded: loaded (/etc/systemd/system/docker.service; enabled; vendor preset: disabled)
   Active: active (running) since 一 2021-10-04 18:48:23 CST; 19s ago
     Docs: https://docs.docker.com
 Main PID: 3450 (dockerd)
   Memory: 31.5M
   CGroup: /system.slice/docker.service
           ├─3450 /usr/bin/dockerd --selinux-enabled=false --insecure-registry=127.0.0.1 -H tcp://0.0.0.0:2375 -H unix:///var/run/docker.sock
           └─3456 containerd --config /var/run/docker/containerd/containerd.toml --log-level info

10月 04 18:48:22 localhost.localdomain dockerd[3450]: time="2021-10-04T18:48:22.878828624+08:00" level=info msg="[graphdriver] using prior storage driver: overlay2"
10月 04 18:48:22 localhost.localdomain dockerd[3450]: time="2021-10-04T18:48:22.882399955+08:00" level=info msg="Loading containers: start."
10月 04 18:48:22 localhost.localdomain dockerd[3450]: time="2021-10-04T18:48:22.985942592+08:00" level=info msg="Default bridge (docker0) is assigned with an IP address 172.17.0.0/16. Daemon option --bip can be used...red IP address"
10月 04 18:48:23 localhost.localdomain dockerd[3450]: time="2021-10-04T18:48:23.030186815+08:00" level=info msg="Loading containers: done."
10月 04 18:48:23 localhost.localdomain dockerd[3450]: time="2021-10-04T18:48:23.042677371+08:00" level=warning msg="Not using native diff for overlay2, this may cause degraded performance for building images: opaque...driver=overlay2
10月 04 18:48:23 localhost.localdomain dockerd[3450]: time="2021-10-04T18:48:23.042823731+08:00" level=info msg="Docker daemon" commit=99e3ed8 graphdriver(s)=overlay2 version=19.03.15
10月 04 18:48:23 localhost.localdomain dockerd[3450]: time="2021-10-04T18:48:23.042856502+08:00" level=info msg="Daemon has completed initialization"
10月 04 18:48:23 localhost.localdomain systemd[1]: Started Docker Application Container Engine.
10月 04 18:48:23 localhost.localdomain dockerd[3450]: time="2021-10-04T18:48:23.069835811+08:00" level=info msg="API listen on /var/run/docker.sock"
10月 04 18:48:23 localhost.localdomain dockerd[3450]: time="2021-10-04T18:48:23.069967543+08:00" level=info msg="API listen on [::]:2375"
Hint: Some lines were ellipsized, use -l to show in full.
创建Swarm集群
- Pull swarm的镜像(三个节点都做)
docker pull swarm
- 在node1上创建集群,如下命令
docker swarm init --advertise-addr 192.168.107.110
上面命令执行后,该机器自动加入到swarm集群。这个会创建一个集群token,获取全球唯一的 token,作为集群唯一标识。后续将其他节点加入集群都会用到这个token值。
其中,--advertise-addr参数表示其它swarm中的worker节点使用此ip地址与manager联系。命令的输出包含了其它节点如何加入集群的命令。
如果根据提示,在node2上使用docker swarm join --token SWMTKN-1-1br84t8xxtu3h42v7qhcjqbvvk8ix12l7rfh20nwo3ytzm3vok-dagq05je4rnvmcuhe5id251mq 192.168.197.30:2377命令加入集群
docker swarm join --token SWMTKN-1-1br84t8xxtu3h42v7qhcjqbvvk8ix12l7rfh20nwo3ytzm3vok-dagq05je4rnvmcuhe5id251mq 192.168.197.30:2377
- 查看集群节点状态,使用以下命令
docker node list
[root@localhost docker]# docker node list
ID                            HOSTNAME                STATUS              AVAILABILITY        MANAGER STATUS      ENGINE VERSION
3x3bzhr8zrayyzgdcvjcjv6fk     localhost.localdomain   Ready               Active                                  19.03.15
ctihteeuz146tqizjjk603xb1 *   localhost.localdomain   Ready               Active              Leader              19.03.15
lb1uoa2ukrerzvgku67xyrnyb     localhost.localdomain   Ready               Active                                  19.03.15
Portainer中文汉化
- 下载汉化包
https://pan.baidu.com/s/13ra6jXHR_7vajLLlf5GVEw?at=1633343987220 提取码: nzue
- 新建文件夹命名为 public ,把 Portainer-CN.zip 解压至里面。
mkdir -p /mydata/portainer/public
- 然后按需执行以下命令 x86-64系统使用
docker volume create portainer_data
docker run -d -p 9000:9000 -v /var/run/docker.sock:/var/run/docker.sock -v portainer_data:/data -v /mydata/portainer/public:/public --name=portainer  portainer/portainer
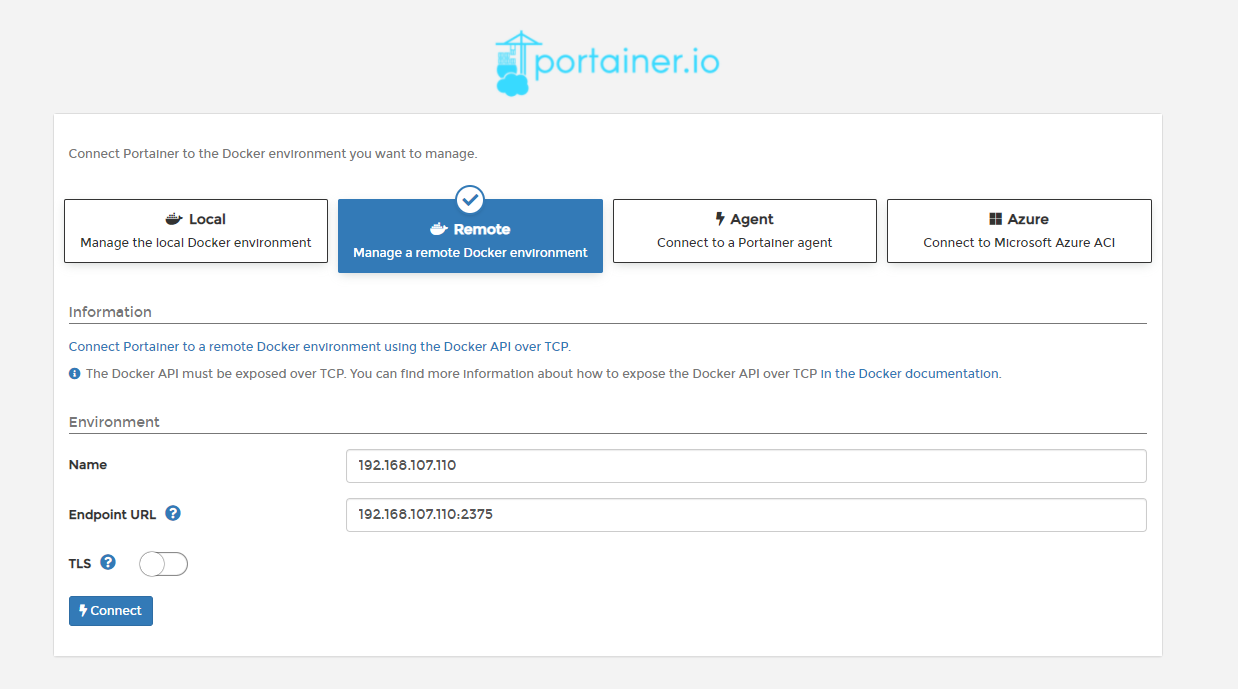
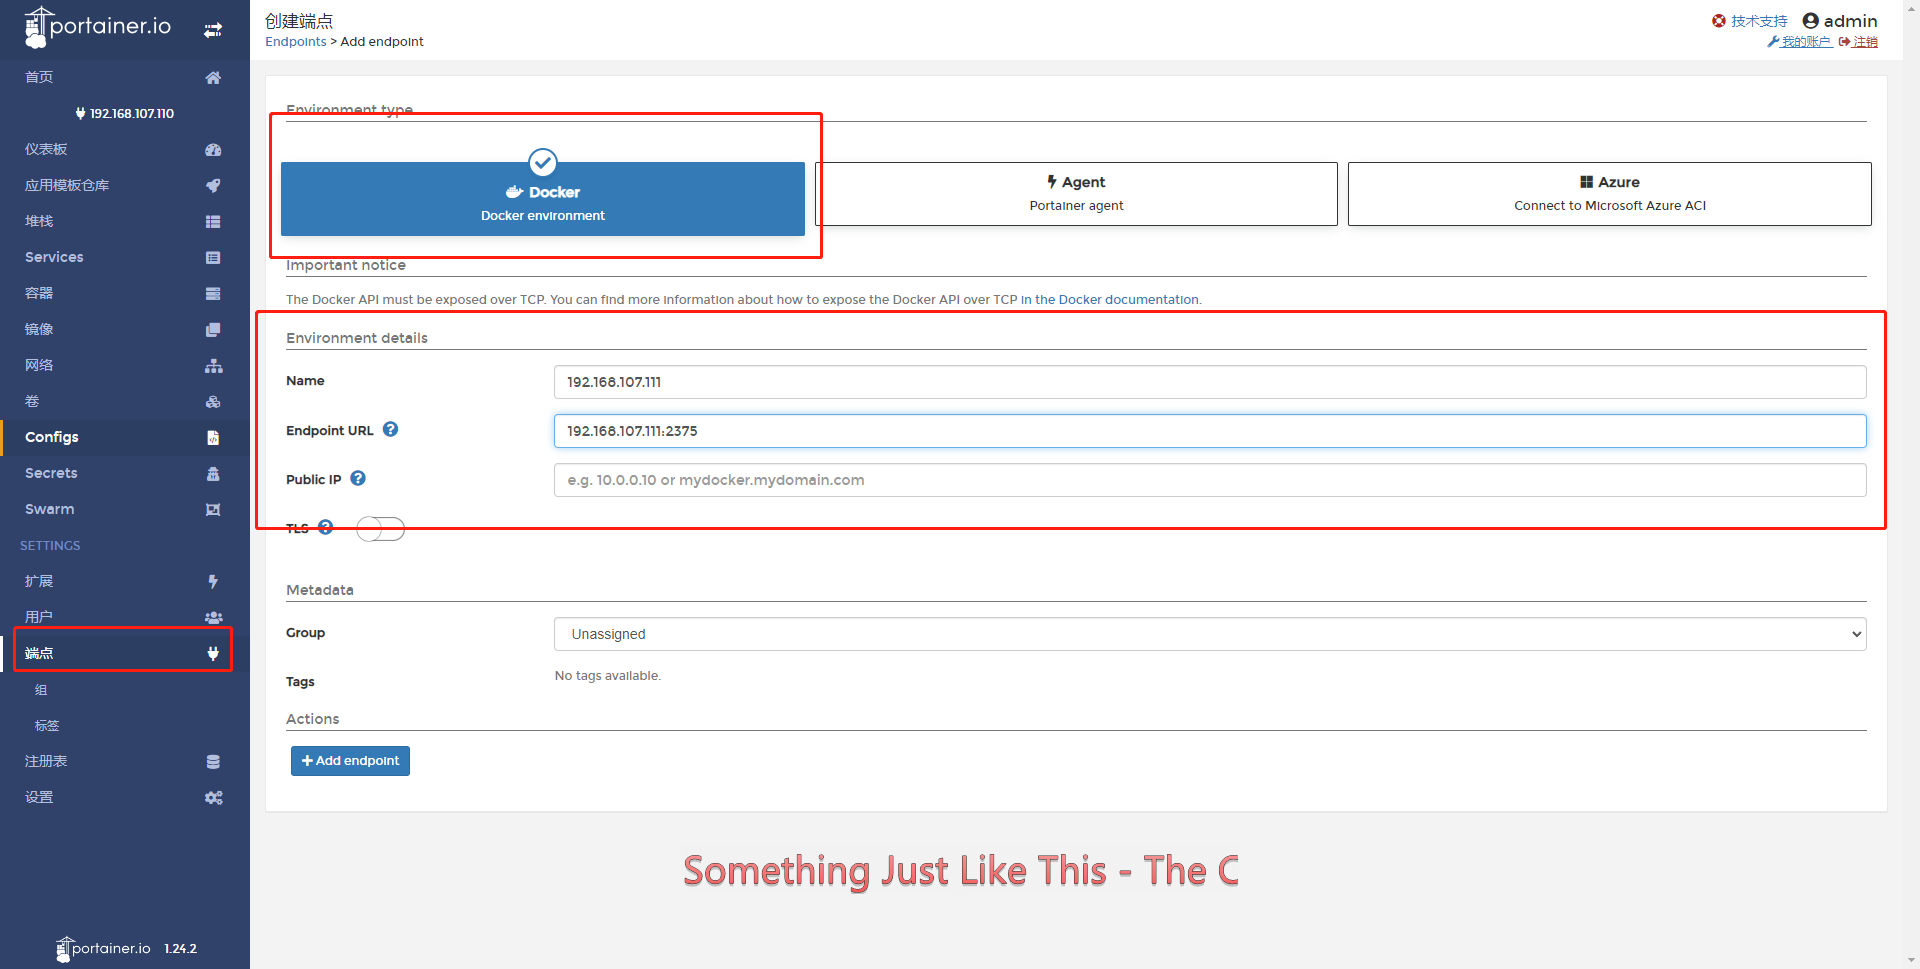
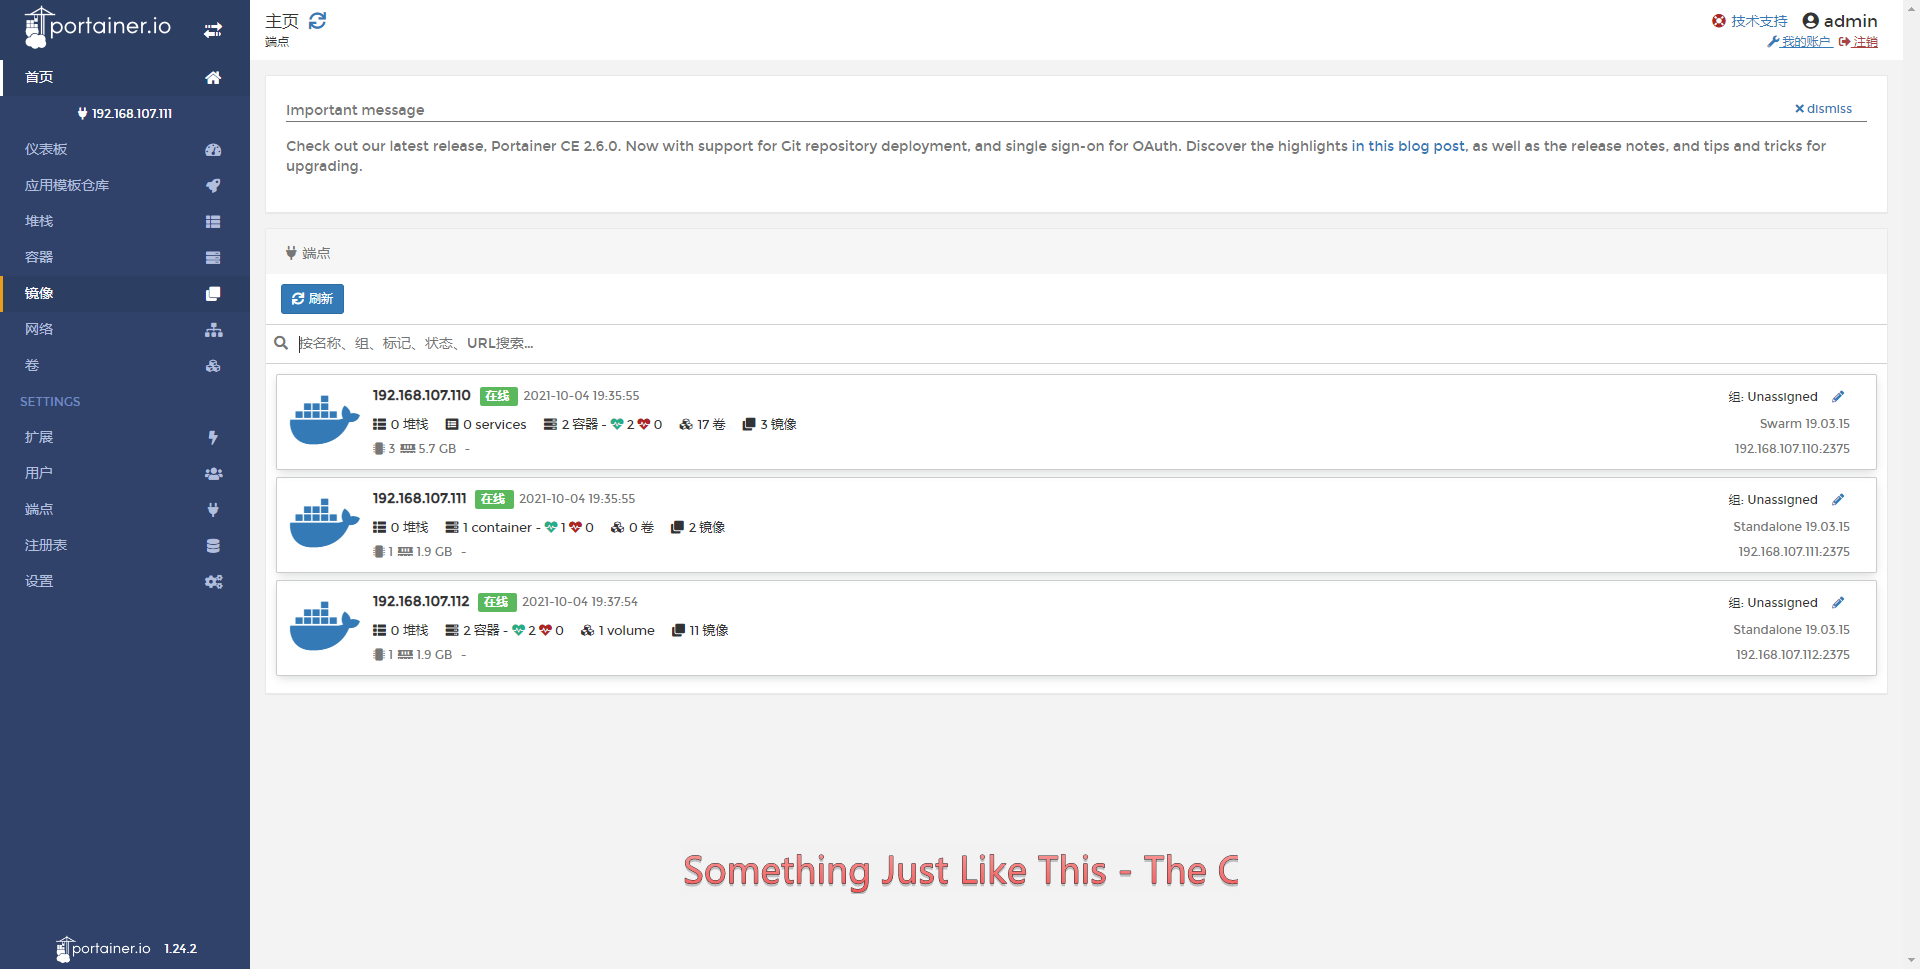
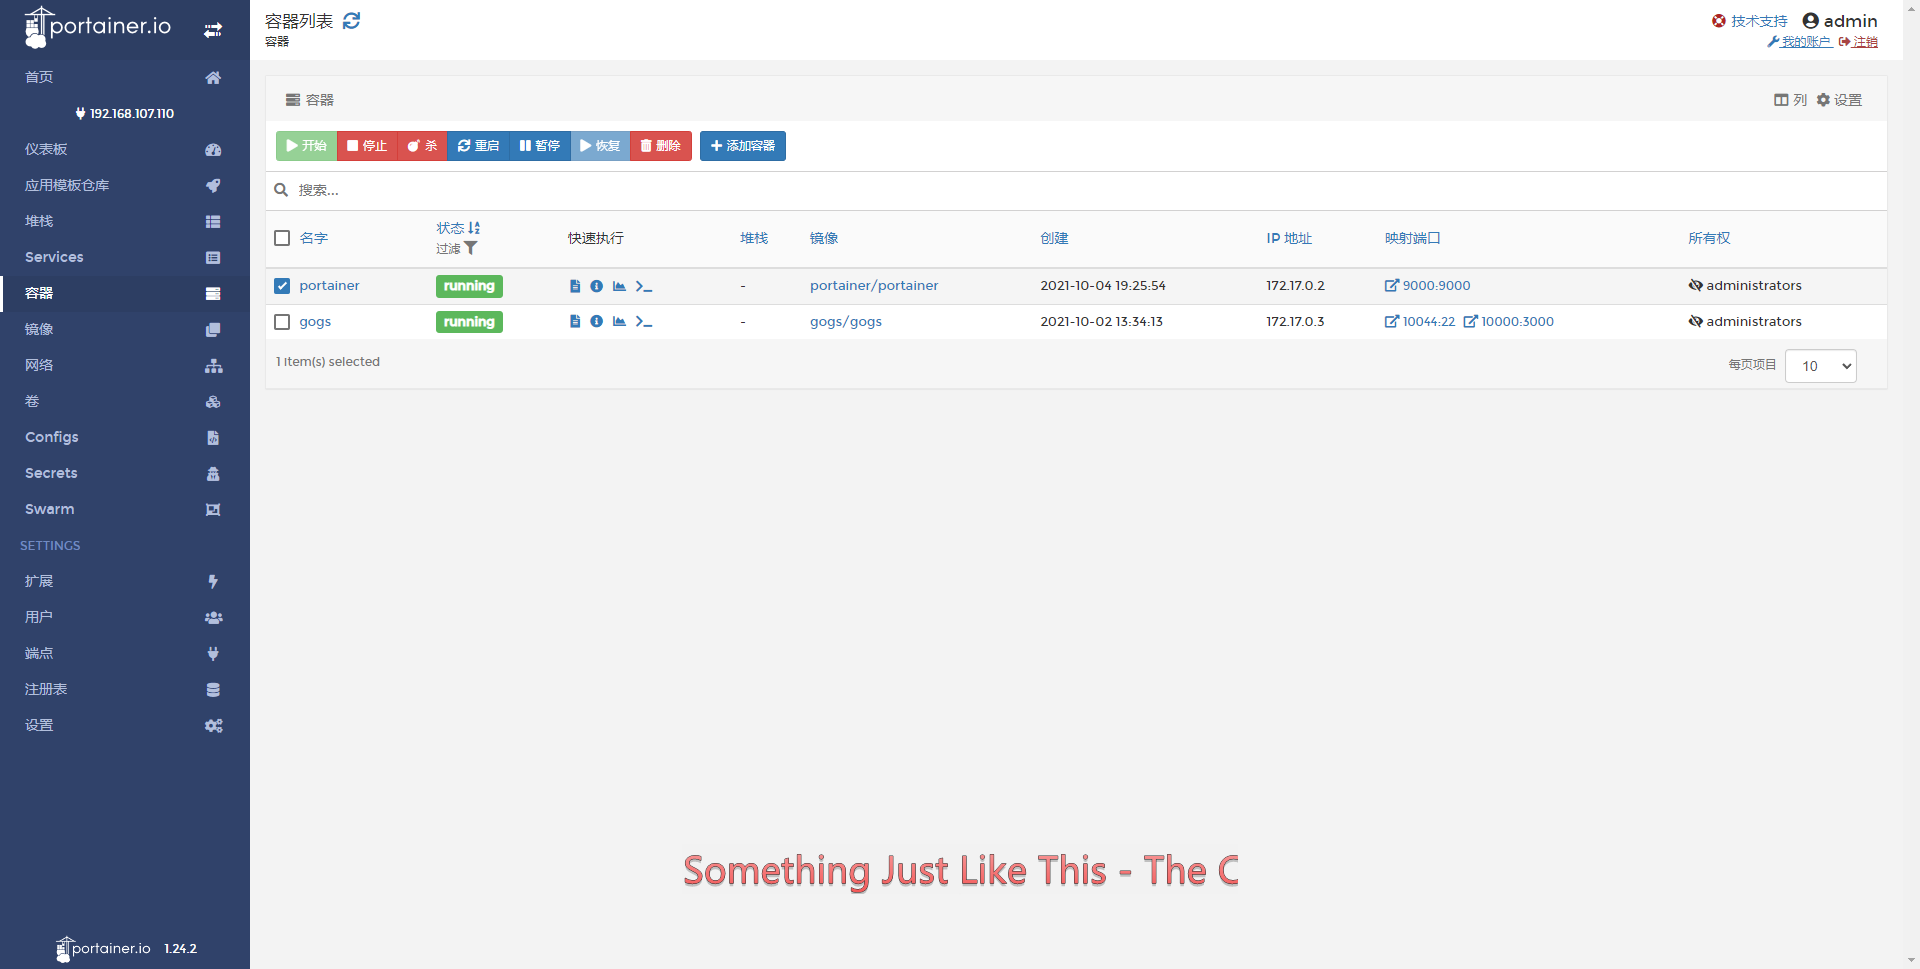
- 增加端点
安装Harbor
前置条件
Harbor is deployed as several Docker containers. You can therefore deploy it on any Linux distribution that supports Docker. The target host requires Docker, and Docker Compose to be installed.

Hardware
The following table lists the minimum and recommended hardware configurations for deploying Harbor.

Resource	Minimum	Recommended
CPU	2 CPU	4 CPU
Mem	4 GB	8 GB
Disk	40 GB	160 GB
Software
The following table lists the software versions that must be installed on the target host.

Software	Version	Description
Docker engine	Version 17.06.0-ce+ or higher	For installation instructions, see Docker Engine documentation
Docker Compose	Version 1.18.0 or higher	For installation instructions, see Docker Compose documentation
Openssl	Latest is preferred	Used to generate certificate and keys for Harbor
Network ports
Harbor requires that the following ports be open on the target host.

Port	Protocol	Description
443	HTTPS	Harbor portal and core API accept HTTPS requests on this port. You can change this port in the configuration file.
4443	HTTPS	Connections to the Docker Content Trust service for Harbor. Only required if Notary is enabled. You can change this port in the configuration file.
80	HTTP	Harbor portal and core API accept HTTP requests on this port. You can change this port in the configuration file.
Docker Docker Compose
安装Docker-compose
https://github.com/docker/compose/releases
- docker-compose-linux-x86_64 改名 docker-compose 上传到 /usr/bin/ 目录下
- 增加执行权限
chmod +x /usr/bin/docker-compose
- 测试 docker-compose --version 回显 Docker Compose version v2.0.1
下载Harbor
https://github.com/goharbor/harbor/releases harbor-online-installer-v2.3.3.tgz
- 创建文件夹
cd /usr/local/src/
mkdir harbor
- 上传解压 harbor-online-installer-v2.3.3.tgz
tar -zxvf harbor-online-installer-v2.3.3.tgz
- 回显
harbor/prepare
harbor/LICENSE
harbor/install.sh
harbor/common.sh
harbor/harbor.yml.tmpl
配置Harbor
cp harbor.yml.tmpl harbor.yml
- 创建存放harbor的持久化数据
mkdir -p /mydata/harbor
- 修改配置
vi harbor.yml
# Configuration file of Harbor

# The IP address or hostname to access admin UI and registry service.
# DO NOT use localhost or 127.0.0.1, because Harbor needs to be accessed by external clients.
hostname: 192.168.107.110  //设置访问地址,可以使用ip、域名,不可以设置为127.0.0.1或localhost。默认情况下,harbor使用的端口是80,若使用自定义的端口,除了要改docker-compose.yml文件中的配置外,这里的hostname也要加上自定义的端口,否则在docker login、push时会报错
#http配置

# http related config
http:
  # port for http, default is 80. If https enabled, this port will redirect to https port
  port: 10001

# https related config
#https:
  # https port for harbor, default is 443
  #port: 443
  # The path of cert and key files for nginx
 # certificate: /your/certificate/path
 # private_key: /your/private/key/path

# # Uncomment following will enable tls communication between all harbor components
# internal_tls:
#   # set enabled to true means internal tls is enabled
#   enabled: true
#   # put your cert and key files on dir
#   dir: /etc/harbor/tls/internal

# Uncomment external_url if you want to enable external proxy
# And when it enabled the hostname will no longer used
# external_url: https://reg.mydomain.com:8433 //如果要启用外部代理,比如外层的NGINX、LB等,请取消注释external_url,当它启用时,hostname将不再使用。

# The initial password of Harbor admin
# It only works in first time to install harbor
# Remember Change the admin password from UI after launching Harbor.
harbor_admin_password: Harbor12345

# Harbor DB configuration
database:
  # The password for the root user of Harbor DB. Change this before any production use.
  password: root123
  # The maximum number of connections in the idle connection pool. If it <=0, no idle connections are retained.
  max_idle_conns: 100
  # The maximum number of open connections to the database. If it <= 0, then there is no limit on the number of open connections.
  # Note: the default number of connections is 1024 for postgres of harbor.
  max_open_conns: 900

# The default data volume
data_volume: /mydata/harbor

# Harbor Storage settings by default is using /data dir on local filesystem
# Uncomment storage_service setting If you want to using external storage
# storage_service:
#   # ca_bundle is the path to the custom root ca certificate, which will be injected into the truststore
#   # of registry's and chart repository's containers.  This is usually needed when the user hosts a internal storage with self signed certificate.
#   ca_bundle:

#   # storage backend, default is filesystem, options include filesystem, azure, gcs, s3, swift and oss
#   # for more info about this configuration please refer https://docs.docker.com/registry/configuration/
#   filesystem:
#     maxthreads: 100
#   # set disable to true when you want to disable registry redirect
#   redirect:
#     disabled: false

# Trivy configuration
#
# Trivy DB contains vulnerability information from NVD, Red Hat, and many other upstream vulnerability databases.
# It is downloaded by Trivy from the GitHub release page https://github.com/aquasecurity/trivy-db/releases and cached
# in the local file system. In addition, the database contains the update timestamp so Trivy can detect whether it
# should download a newer version from the Internet or use the cached one. Currently, the database is updated every
# 12 hours and published as a new release to GitHub.
trivy:
  # ignoreUnfixed The flag to display only fixed vulnerabilities
  ignore_unfixed: false
  # skipUpdate The flag to enable or disable Trivy DB downloads from GitHub
  #
  # You might want to enable this flag in test or CI/CD environments to avoid GitHub rate limiting issues.
  # If the flag is enabled you have to download the `trivy-offline.tar.gz` archive manually, extract `trivy.db` and
  # `metadata.json` files and mount them in the `/home/scanner/.cache/trivy/db` path.
  skip_update: false
  #
  # insecure The flag to skip verifying registry certificate
  insecure: false
  # github_token The GitHub access token to download Trivy DB
  #
  # Anonymous downloads from GitHub are subject to the limit of 60 requests per hour. Normally such rate limit is enough
  # for production operations. If, for any reason, it's not enough, you could increase the rate limit to 5000
  # requests per hour by specifying the GitHub access token. For more details on GitHub rate limiting please consult
  # https://developer.github.com/v3/#rate-limiting
  #
  # You can create a GitHub token by following the instructions in
  # https://help.github.com/en/github/authenticating-to-github/creating-a-personal-access-token-for-the-command-line
  #
  # github_token: xxx

jobservice:
  # Maximum number of job workers in job service
  max_job_workers: 10

notification:
  # Maximum retry count for webhook job
  webhook_job_max_retry: 10

chart:
  # Change the value of absolute_url to enabled can enable absolute url in chart
  absolute_url: disabled

# Log configurations
log:
  # options are debug, info, warning, error, fatal
  level: info
  # configs for logs in local storage
  local:
    # Log files are rotated log_rotate_count times before being removed. If count is 0, old versions are removed rather than rotated.
    rotate_count: 50
    # Log files are rotated only if they grow bigger than log_rotate_size bytes. If size is followed by k, the size is assumed to be in kilobytes.
    # If the M is used, the size is in megabytes, and if G is used, the size is in gigabytes. So size 100, size 100k, size 100M and size 100G
    # are all valid.
    rotate_size: 200M
    # The directory on your host that store log
    location: /var/log/harbor

  # Uncomment following lines to enable external syslog endpoint.
  # external_endpoint:
  #   # protocol used to transmit log to external endpoint, options is tcp or udp
  #   protocol: tcp
  #   # The host of external endpoint
  #   host: localhost
  #   # Port of external endpoint
  #   port: 5140

#This attribute is for migrator to detect the version of the .cfg file, DO NOT MODIFY!
_version: 2.3.0

# Uncomment external_database if using external database.
# external_database:
#   harbor:
#     host: harbor_db_host
#     port: harbor_db_port
#     db_name: harbor_db_name
#     username: harbor_db_username
#     password: harbor_db_password
#     ssl_mode: disable
#     max_idle_conns: 2
#     max_open_conns: 0
#   notary_signer:
#     host: notary_signer_db_host
#     port: notary_signer_db_port
#     db_name: notary_signer_db_name
#     username: notary_signer_db_username
#     password: notary_signer_db_password
#     ssl_mode: disable
#   notary_server:
#     host: notary_server_db_host
#     port: notary_server_db_port
#     db_name: notary_server_db_name
#     username: notary_server_db_username
#     password: notary_server_db_password
#     ssl_mode: disable

# Uncomment external_redis if using external Redis server
# external_redis:
#   # support redis, redis+sentinel
#   # host for redis: <host_redis>:<port_redis>
#   # host for redis+sentinel:
#   #  <host_sentinel1>:<port_sentinel1>,<host_sentinel2>:<port_sentinel2>,<host_sentinel3>:<port_sentinel3>
#   host: redis:6379
#   password:
#   # sentinel_master_set must be set to support redis+sentinel
#   #sentinel_master_set:
#   # db_index 0 is for core, it's unchangeable
#   registry_db_index: 1
#   jobservice_db_index: 2
#   chartmuseum_db_index: 3
#   trivy_db_index: 5
#   idle_timeout_seconds: 30

# Uncomment uaa for trusting the certificate of uaa instance that is hosted via self-signed cert.
# uaa:
#   ca_file: /path/to/ca

# Global proxy
# Config http proxy for components, e.g. http://my.proxy.com:3128
# Components doesn't need to connect to each others via http proxy.
# Remove component from `components` array if want disable proxy
# for it. If you want use proxy for replication, MUST enable proxy
# for core and jobservice, and set `http_proxy` and `https_proxy`.
# Add domain to the `no_proxy` field, when you want disable proxy
# for some special registry.
proxy:
  http_proxy:
  https_proxy:
  no_proxy:
  components:
    - core
    - jobservice
    - trivy

# metric:
#   enabled: false
#   port: 9090
#   path: /metrics
- 主要修改 hostname: 192.168.107.110 http. port: 10001 data_volume: /mydata/harbor
- 不用https 全部注释
# Configuration file of Harbor

# The IP address or hostname to access admin UI and registry service.
# DO NOT use localhost or 127.0.0.1, because Harbor needs to be accessed by external clients.
hostname: 192.168.107.110

# http related config
http:
  # port for http, default is 80. If https enabled, this port will redirect to https port
  port: 10001

# https related config
#https:
#  # https port for harbor, default is 443
#  port: 443
#  # The path of cert and key files for nginx
#  certificate: /your/certificate/path
#  private_key: /your/private/key/path

# # Uncomment following will enable tls communication between all harbor components
# internal_tls:
#   # set enabled to true means internal tls is enabled
#   enabled: true
#   # put your cert and key files on dir
#   dir: /etc/harbor/tls/internal

# Uncomment external_url if you want to enable external proxy
# And when it enabled the hostname will no longer used
# external_url: https://reg.mydomain.com:8433

# The initial password of Harbor admin
# It only works in first time to install harbor
# Remember Change the admin password from UI after launching Harbor.
harbor_admin_password: Harbor12345

# Harbor DB configuration
database:
  # The password for the root user of Harbor DB. Change this before any production use.
  password: root123
  # The maximum number of connections in the idle connection pool. If it <=0, no idle connections are retained.
  max_idle_conns: 100
  # The maximum number of open connections to the database. If it <= 0, then there is no limit on the number of open connections.
  # Note: the default number of connections is 1024 for postgres of harbor.
  max_open_conns: 900

# The default data volume
data_volume: /mydata/harbor

# Harbor Storage settings by default is using /data dir on local filesystem
# Uncomment storage_service setting If you want to using external storage
# storage_service:
#   # ca_bundle is the path to the custom root ca certificate, which will be injected into the truststore
#   # of registry's and chart repository's containers.  This is usually needed when the user hosts a internal storage with self signed certificate.
#   ca_bundle:

#   # storage backend, default is filesystem, options include filesystem, azure, gcs, s3, swift and oss
#   # for more info about this configuration please refer https://docs.docker.com/registry/configuration/
#   filesystem:
#     maxthreads: 100
#   # set disable to true when you want to disable registry redirect
#   redirect:
#     disabled: false

# Trivy configuration
#
# Trivy DB contains vulnerability information from NVD, Red Hat, and many other upstream vulnerability databases.
# It is downloaded by Trivy from the GitHub release page https://github.com/aquasecurity/trivy-db/releases and cached
# in the local file system. In addition, the database contains the update timestamp so Trivy can detect whether it
# should download a newer version from the Internet or use the cached one. Currently, the database is updated every
# 12 hours and published as a new release to GitHub.
trivy:
  # ignoreUnfixed The flag to display only fixed vulnerabilities
  ignore_unfixed: false
  # skipUpdate The flag to enable or disable Trivy DB downloads from GitHub
  #
  # You might want to enable this flag in test or CI/CD environments to avoid GitHub rate limiting issues.
  # If the flag is enabled you have to download the `trivy-offline.tar.gz` archive manually, extract `trivy.db` and
  # `metadata.json` files and mount them in the `/home/scanner/.cache/trivy/db` path.
  skip_update: false
  #
  # insecure The flag to skip verifying registry certificate
  insecure: false
  # github_token The GitHub access token to download Trivy DB
  #
  # Anonymous downloads from GitHub are subject to the limit of 60 requests per hour. Normally such rate limit is enough
  # for production operations. If, for any reason, it's not enough, you could increase the rate limit to 5000
  # requests per hour by specifying the GitHub access token. For more details on GitHub rate limiting please consult
  # https://developer.github.com/v3/#rate-limiting
  #
  # You can create a GitHub token by following the instructions in
  # https://help.github.com/en/github/authenticating-to-github/creating-a-personal-access-token-for-the-command-line
  #
  # github_token: xxx

jobservice:
  # Maximum number of job workers in job service
  max_job_workers: 10

notification:
  # Maximum retry count for webhook job
  webhook_job_max_retry: 10

chart:
  # Change the value of absolute_url to enabled can enable absolute url in chart
  absolute_url: disabled

# Log configurations
log:
  # options are debug, info, warning, error, fatal
  level: info
  # configs for logs in local storage
  local:
    # Log files are rotated log_rotate_count times before being removed. If count is 0, old versions are removed rather than rotated.
    rotate_count: 50
    # Log files are rotated only if they grow bigger than log_rotate_size bytes. If size is followed by k, the size is assumed to be in kilobytes.
    # If the M is used, the size is in megabytes, and if G is used, the size is in gigabytes. So size 100, size 100k, size 100M and size 100G
    # are all valid.
    rotate_size: 200M
    # The directory on your host that store log
    location: /var/log/harbor

  # Uncomment following lines to enable external syslog endpoint.
  # external_endpoint:
  #   # protocol used to transmit log to external endpoint, options is tcp or udp
  #   protocol: tcp
  #   # The host of external endpoint
  #   host: localhost
  #   # Port of external endpoint
  #   port: 5140

#This attribute is for migrator to detect the version of the .cfg file, DO NOT MODIFY!
_version: 2.3.0

# Uncomment external_database if using external database.
# external_database:
#   harbor:
#     host: harbor_db_host
#     port: harbor_db_port
#     db_name: harbor_db_name
#     username: harbor_db_username
#     password: harbor_db_password
#     ssl_mode: disable
#     max_idle_conns: 2
#     max_open_conns: 0
#   notary_signer:
#     host: notary_signer_db_host
#     port: notary_signer_db_port
#     db_name: notary_signer_db_name
#     username: notary_signer_db_username
#     password: notary_signer_db_password
#     ssl_mode: disable
#   notary_server:
#     host: notary_server_db_host
#     port: notary_server_db_port
#     db_name: notary_server_db_name
#     username: notary_server_db_username
#     password: notary_server_db_password
#     ssl_mode: disable

# Uncomment external_redis if using external Redis server
# external_redis:
#   # support redis, redis+sentinel
#   # host for redis: <host_redis>:<port_redis>
#   # host for redis+sentinel:
#   #  <host_sentinel1>:<port_sentinel1>,<host_sentinel2>:<port_sentinel2>,<host_sentinel3>:<port_sentinel3>
#   host: redis:6379
#   password:
#   # sentinel_master_set must be set to support redis+sentinel
#   #sentinel_master_set:
#   # db_index 0 is for core, it's unchangeable
#   registry_db_index: 1
#   jobservice_db_index: 2
#   chartmuseum_db_index: 3
#   trivy_db_index: 5
#   idle_timeout_seconds: 30

# Uncomment uaa for trusting the certificate of uaa instance that is hosted via self-signed cert.
# uaa:
#   ca_file: /path/to/ca

# Global proxy
# Config http proxy for components, e.g. http://my.proxy.com:3128
# Components doesn't need to connect to each others via http proxy.
# Remove component from `components` array if want disable proxy
# for it. If you want use proxy for replication, MUST enable proxy
# for core and jobservice, and set `http_proxy` and `https_proxy`.
# Add domain to the `no_proxy` field, when you want disable proxy
# for some special registry.
proxy:
  http_proxy:
  https_proxy:
  no_proxy:
  components:
    - core
    - jobservice
    - trivy

# metric:
#   enabled: false
#   port: 9090
#   path: /metrics
安装并启动Harbor
./install.sh
回显
 ⠿ Container harbor-log         Started                                                                                                                                                                                              0.6s
 ⠿ Container redis              Started                                                                                                                                                                                              2.1s
 ⠿ Container harbor-db          Started                                                                                                                                                                                              2.1s
 ⠿ Container registryctl        Started                                                                                                                                                                                              2.1s
 ⠿ Container harbor-portal      Started                                                                                                                                                                                              1.7s
 ⠿ Container registry           Started                                                                                                                                                                                              2.2s
 ⠿ Container harbor-core        Started                                                                                                                                                                                              3.0s
 ⠿ Container harbor-jobservice  Started                                                                                                                                                                                              4.0s
 ⠿ Container nginx              Started                                                                                                                                                                                              3.9s
✔ ----Harbor has been installed and started successfully.----
- harbor 所需镜像
[root@localhost harbor]# docker images
REPOSITORY                    TAG                 IMAGE ID            CREATED             SIZE
goharbor/redis-photon         v2.3.3              5b8e952b8f45        11 days ago         165MB
goharbor/harbor-registryctl   v2.3.3              ffea0a2c3674        11 days ago         133MB
goharbor/registry-photon      v2.3.3              08b0e6fe666e        11 days ago         81.9MB
goharbor/nginx-photon         v2.3.3              43487013ae1e        11 days ago         45MB
goharbor/harbor-log           v2.3.3              77b2d1cb3ab2        11 days ago         168MB
goharbor/harbor-jobservice    v2.3.3              cb3b2c9d8f57        11 days ago         211MB
goharbor/harbor-core          v2.3.3              f065d61635a8        11 days ago         193MB
goharbor/harbor-portal        v2.3.3              eeb24c004c47        11 days ago         58.2MB
goharbor/harbor-db            v2.3.3              7f32a2a21263        11 days ago         237MB
goharbor/prepare              v2.3.3              9f7ce0f16ecc        11 days ago         262MB
- harbor运行的容器
[root@localhost harbor]# docker ps
CONTAINER ID        IMAGE                                COMMAND                  CREATED              STATUS                        PORTS                       NAMES
36ca69afbaf3        goharbor/harbor-jobservice:v2.3.3    "/harbor/entrypoint.…"   About a minute ago   Up About a minute (healthy)                               harbor-jobservice
8610001db5fe        goharbor/nginx-photon:v2.3.3         "nginx -g 'daemon of…"   About a minute ago   Up About a minute (healthy)   0.0.0.0:10001->8080/tcp     nginx
2eb8142f7519        goharbor/harbor-core:v2.3.3          "/harbor/entrypoint.…"   About a minute ago   Up About a minute (healthy)                               harbor-core
56da5c092265        goharbor/redis-photon:v2.3.3         "redis-server /etc/r…"   About a minute ago   Up About a minute (healthy)                               redis
713ee711d618        goharbor/harbor-db:v2.3.3            "/docker-entrypoint.…"   About a minute ago   Up About a minute (healthy)                               harbor-db
1663e5977b19        goharbor/harbor-portal:v2.3.3        "nginx -g 'daemon of…"   About a minute ago   Up About a minute (healthy)                               harbor-portal
4e7a6d5e41af        goharbor/harbor-registryctl:v2.3.3   "/home/harbor/start.…"   About a minute ago   Up About a minute (healthy)                               registryctl
0d91fdbc1134        goharbor/registry-photon:v2.3.3      "/home/harbor/entryp…"   About a minute ago   Up About a minute (healthy)                               registry
5a4582a13671        goharbor/harbor-log:v2.3.3           "/bin/sh -c /usr/loc…"   About a minute ago   Up About a minute (healthy)   127.0.0.1:1514->10514/tcp   harbor-log
[root@localhost harbor]#
访问harbor WEB界面
http://192.168.107.110:10001/ admin Harbor12345
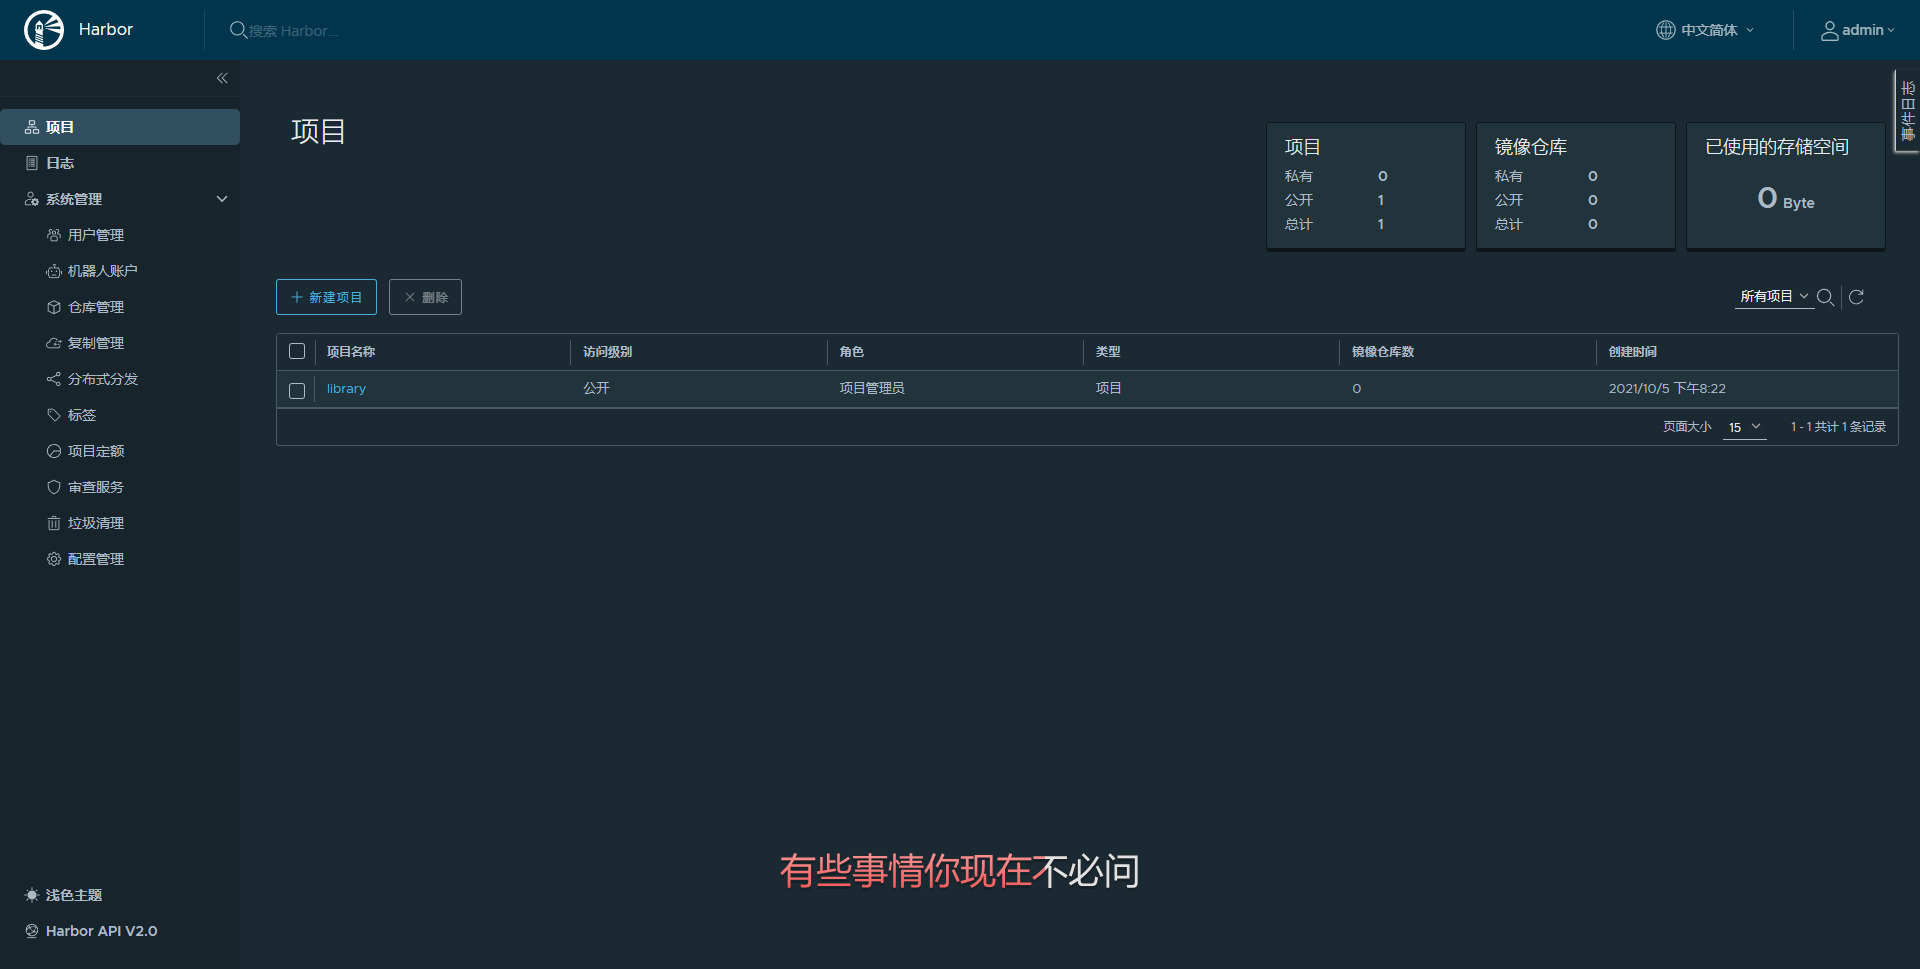
暗黑主题 爱了爱了
Harbor的使用(上传下载镜像)
- Docker自从1.3.X之后docker registry交互默认使用的是HTTPS,但是我们搭建私有镜像默认使用的是HTTP服务,所以修改配置docker配置文件
vi /etc/systemd/system/docker.service
[Unit]
Description=Docker Application Container Engine
Documentation=https://docs.docker.com
After=network-online.target firewalld.service
Wants=network-online.target

[Service]
Type=notify
# the default is not to use systemd for cgroups because the delegate issues still
# exists and systemd currently does not support the cgroup feature set required
# for containers run by docker
ExecStart=/usr/bin/dockerd --selinux-enabled=false --insecure-registry=192.168.107.110:10001 -H tcp://0.0.0.0:2375 -H unix:///var/run/docker.sock
ExecReload=/bin/kill -s HUP $MAINPID
# Having non-zero Limit*s causes performance problems due to accounting overhead
# in the kernel. We recommend using cgroups to do container-local accounting.
LimitNOFILE=infinity
LimitNPROC=infinity
LimitCORE=infinity
# Uncomment TasksMax if your systemd version supports it.
# Only systemd 226 and above support this version.
#TasksMax=infinity
TimeoutStartSec=0
# set delegate yes so that systemd does not reset the cgroups of docker containers
Delegate=yes
# kill only the docker process, not all processes in the cgroup
KillMode=process
# restart the docker process if it exits prematurely
Restart=on-failure
StartLimitBurst=3
StartLimitInterval=60s
主要修改这个--insecure-registry=192.168.107.110:10001
- 然后重新启动Docker:
systemctl daemon-reload
systemctl restart docker
- 检查docker状态 有--insecure-registry=192.168.107.110:10001
systemctl status docker
Harbor如何停止与启动
cd /usr/local/src/harbor/harbor //切换到harbor安装包目录
docker-compose stop //停止Harbor
docker-compose start //启动Harbor
修改配置后docker-compose stop停止所有服务,删除当前配置目录:rm -rf ./common/config下配置清单,重新执行install.sh生成配置
注意:登录
docker login 192.168.107.110:10001
Docker 推送命令
在项目中标记镜像:
docker tag SOURCE_IMAGE[:TAG] 192.168.107.110:10001/kenny/REPOSITORY[:TAG]
docker tag SOURCE_IMAGE[:TAG] 192.168.107.110:10001/kenny/REPOSITORY[:TAG]
推送镜像到当前项目:
docker push 192.168.107.110:10001/kenny/REPOSITORY[:TAG]
docker push 192.168.107.110:10001/kenny/REPOSITORY[:TAG]
大功告成,撒花!!!!!!!!!
Q.E.D.